A bow can be the smallest detail on a manicure or the shape that organizes the entire design. The difference is often placement: a tiny knot at a tip corner feels discreet, while two painted loops across a French edge look graphic. These 18 bow nails explore both approaches, with pink, red, black, chrome, and one holiday-ready option. Every look specifies a shape, finish, and bow position, so you can match the idea to your actual nail length rather than save a pretty reference you cannot use. You will also find ways to keep the motif readable without adding bulky decorations.
Find the Right Bow Scale and Placement
| Your priority | Bow construction | Best starting ideas | Tradeoff |
|---|---|---|---|
| Very short natural nails | Micro corner, single colored outline, or cuticle arc | 1, 3, 5, 8 | Fine loops need enough contrast to remain visible |
| A recognizable pink bow | Filled contrasting loops or translucent satin effect | 2, 16 | Matching shades too closely can hide the knot |
| French nails with a bow | Bow attached to a white edge or built into the tip shape | 6, 7 | The smile line still needs to look intentional |
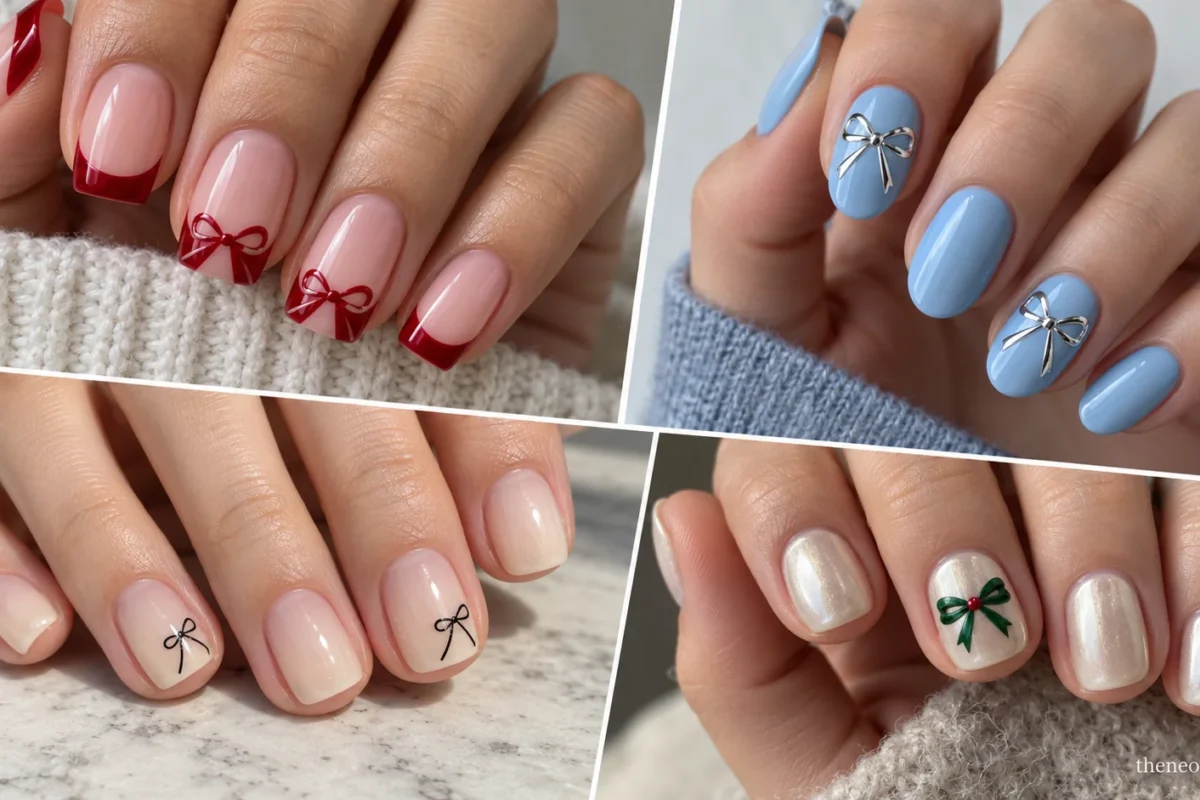
| Dark or reflective statement | Matte/gloss contrast, pearl dots, or metallic bow | 11, 12, 13 | Texture and shine may shift with lighting |
| A temporary event accent | One small raised bow or an illustrated festive tie | 14, 18 | A raised piece may catch on everyday objects |
Two loops, a clear center knot, and at least a hint of ribbon tails make a painted bow easier to recognize. On a narrow nail, draw the loops first and shorten the tails rather than shrinking everything into an unreadable dot. For more help matching artwork to a genuinely compact nail plate, see NeoGlow’s short nails guide.
Tiny and Flat Bow Designs for Short Nails
1. Ink Bows at the Outer Tip Corners
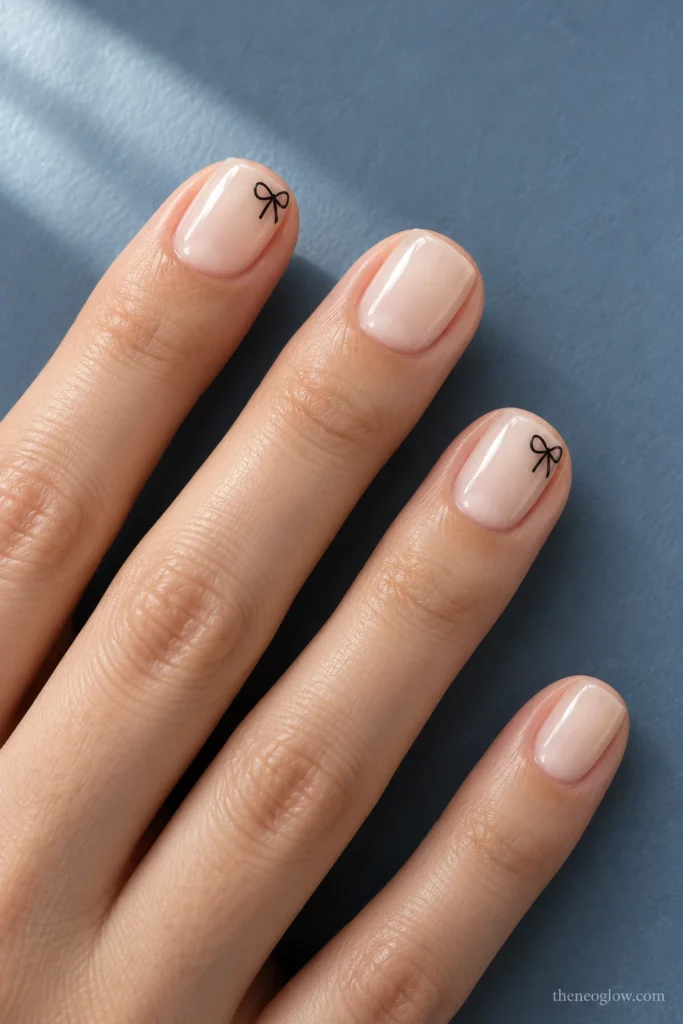
Use short squoval nails coated in translucent warm-ivory gloss. On the index and ring fingers, paint a miniature black outline bow close to the outer right tip corner, with two open loops and very short tails. Leave the other nails clear of artwork. The corner position, not a central accent, gives this set its character; keep the free edge genuinely short.
2. Raspberry Loops on Ballet-Pink Ovals
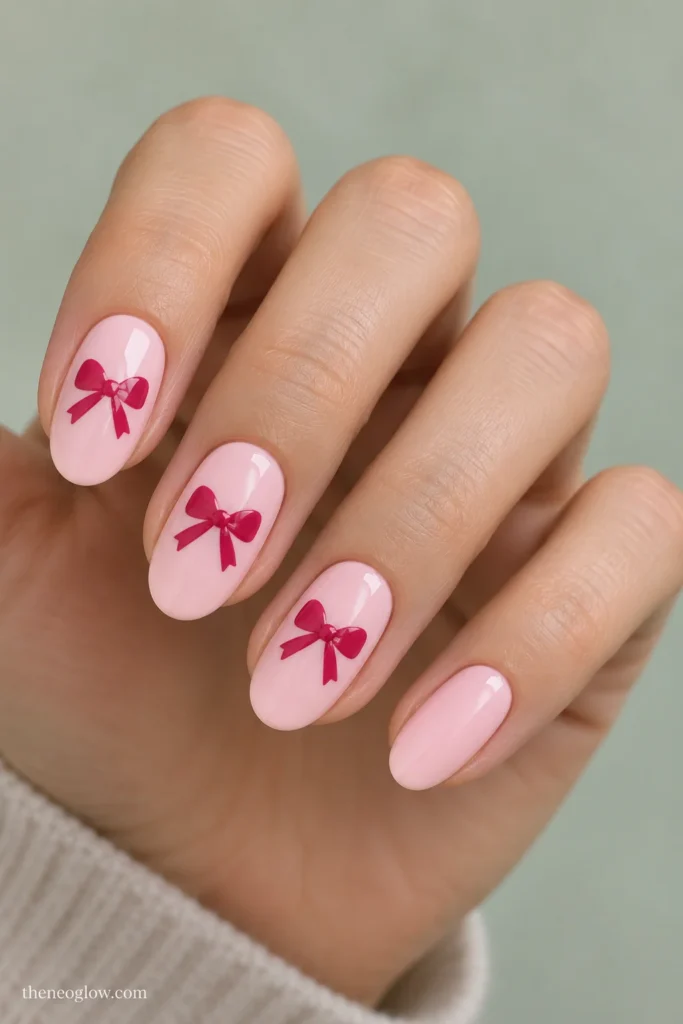
Medium ovals receive opaque, creamy ballet pink. Center a small, filled raspberry bow on the middle three nails, with rounded loops and two short angled tails, then apply a smooth gloss. Unlike a fine outline, these bows read as solid color from a distance. Use slightly deeper raspberry rather than another nearly identical blush if you want the silhouettes to show.
3. Cherry-Red Cuticle Bows on Cornflower Blue
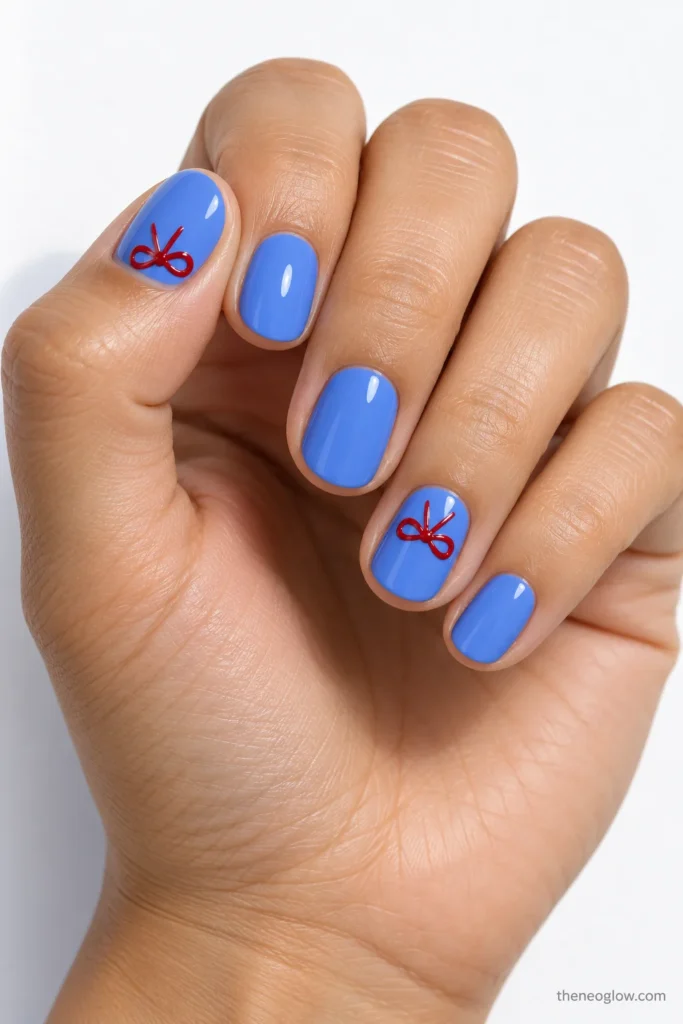
Short round nails get opaque cornflower-blue cream polish. A crisp cherry-red bow sits just above the cuticle on the thumbs and ring fingers, with loops arranged horizontally and the tails pointing toward the tip. The cool blue background makes the red bow the focal point without turning the manicure into a full red set. Keep skin clear of polish.
4. Ivory Side-Tie With Long Ribbon Ends
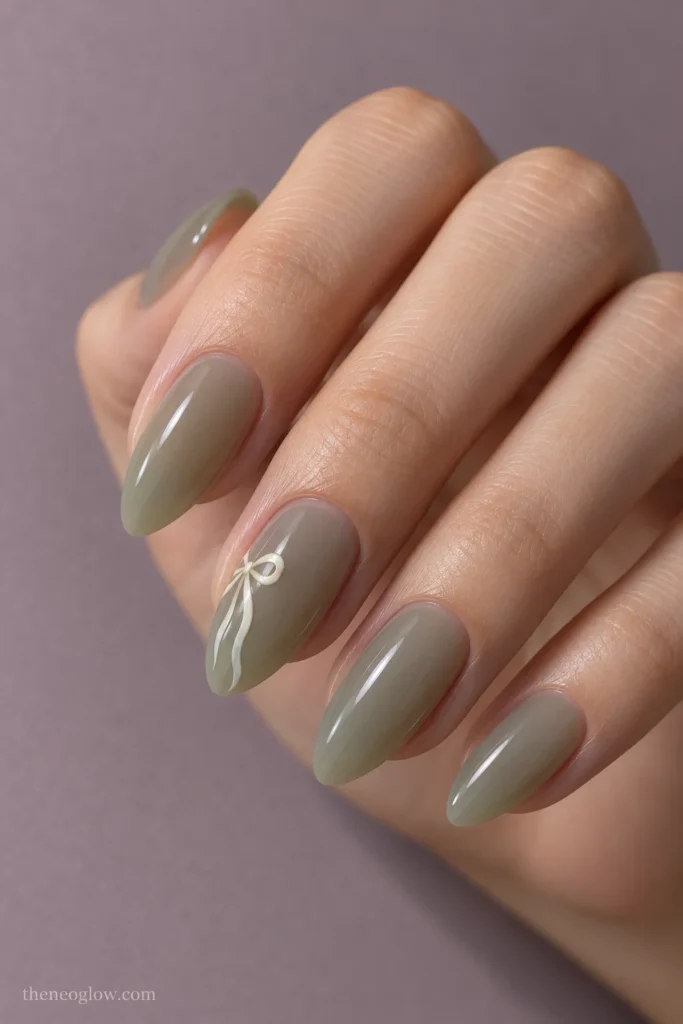
On medium almond nails, use translucent sage-gray jelly with a glossy finish. Paint one ivory bow at the left side of the ring nail, halfway up the plate, and extend two slender tails downward parallel to that edge. The asymmetric, vertical movement is the feature. A second matching bow on the thumb can balance the set without covering every nail.
5. Black Outline Bows on Matte Apricot
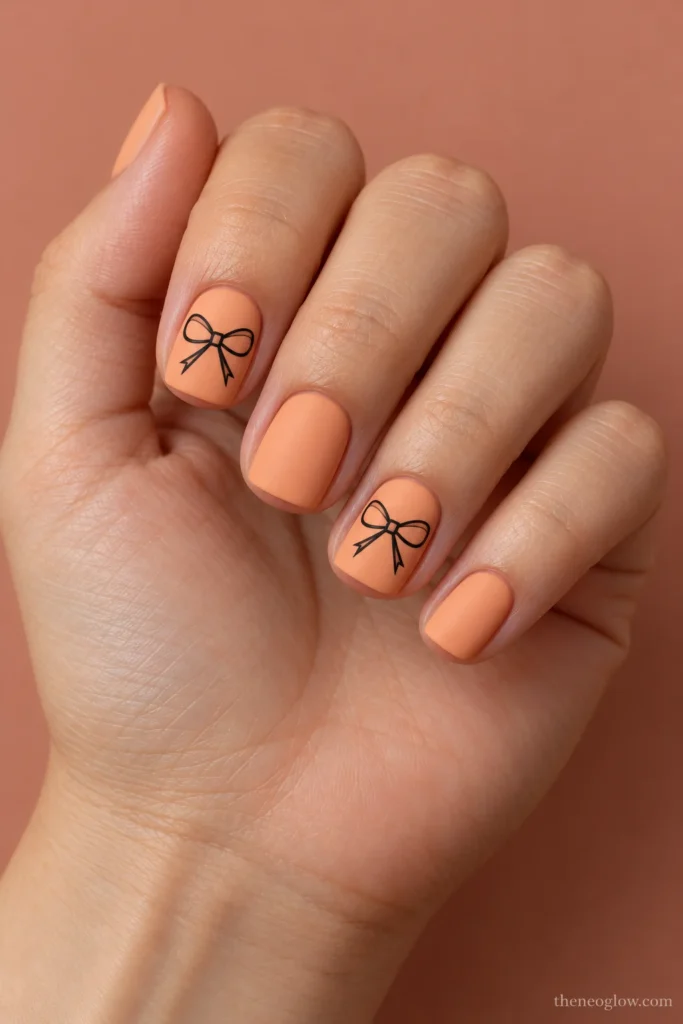
Give short soft-square nails an opaque apricot base with a matte finish. Draw one broad but flat black outline bow across the center of each index and ring nail; use open almond-shaped loops and a square little knot. This is a graphic alternative to dainty black bow nails. Leave a border of apricot around the shape so the loops never look clipped.
French Tips and Ribbon Geometry
6. White French Tips With a Rose Side Knot
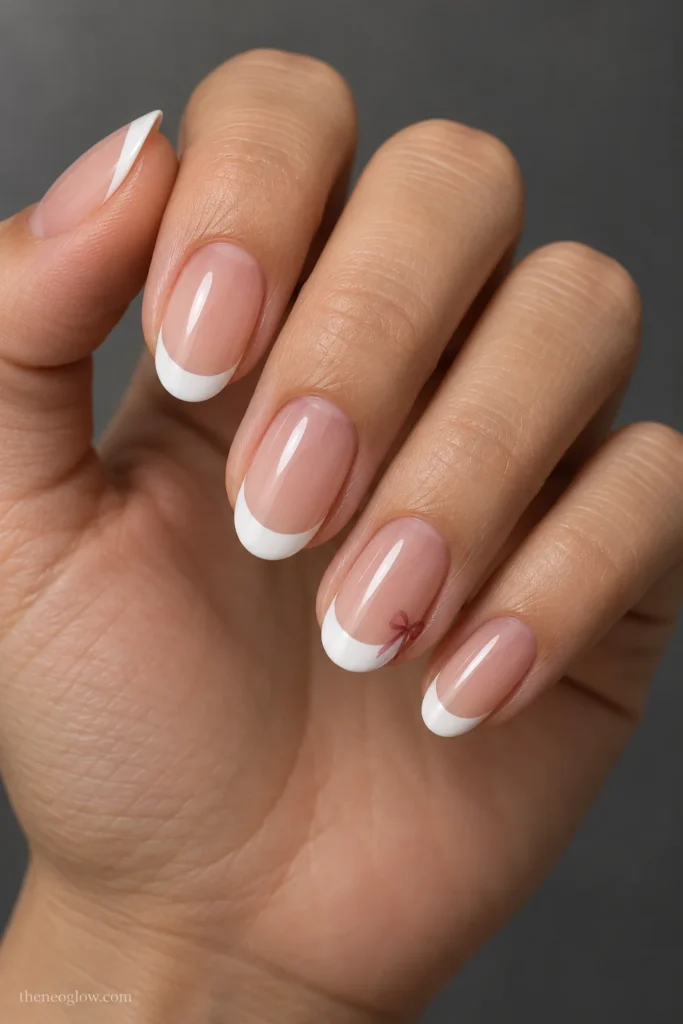
Medium oval nails start with a translucent neutral-pink base and narrow, glossy white French tips. Add a dusty-rose painted bow exactly where the right edge of the white smile line meets the side of the ring fingernail. Its loops face inward, away from the sidewall. Keeping the bow off-center distinguishes this from a white bow crossing a pink French tip.
7. Cherry Bow-Loop French on Soft Squares
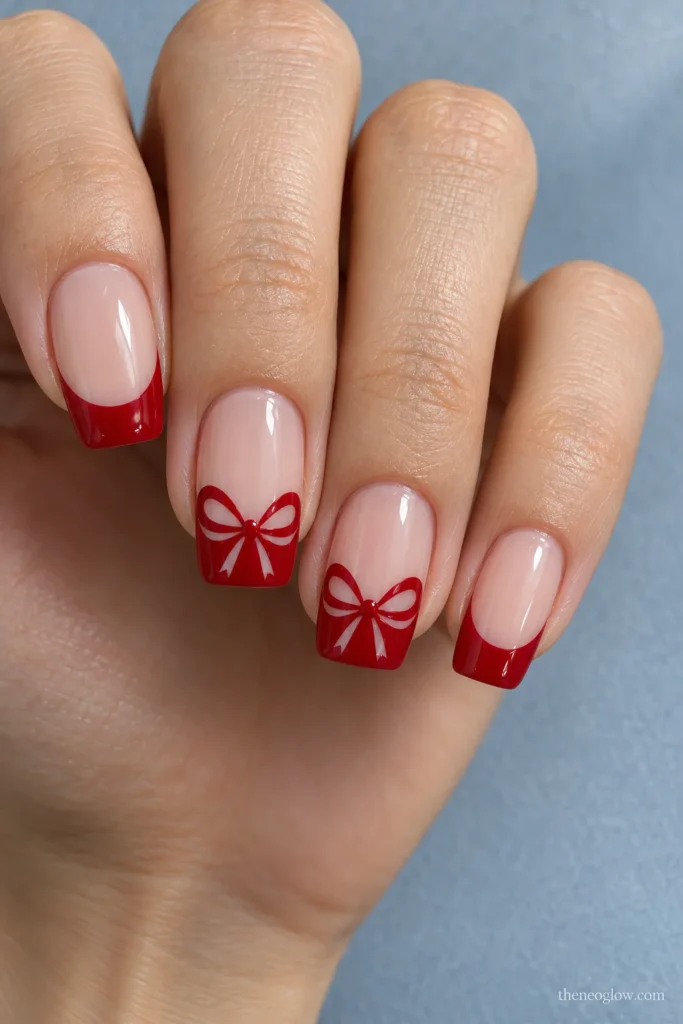
For medium soft-square nails, build a sheer pink-beige base and a glossy cherry-red tip whose inner boundary curves into two bow-like loops on the middle and ring nails. A small red central knot and two short downward tails complete each bow; the remaining nails have plain cherry tips. Here, the bow changes the tip architecture rather than sitting on top of a finished French manicure. For the underlying edge choices, use NeoGlow’s French tip nails guide.
8. Gold-Tied Reverse Cuffs on Ultramarine
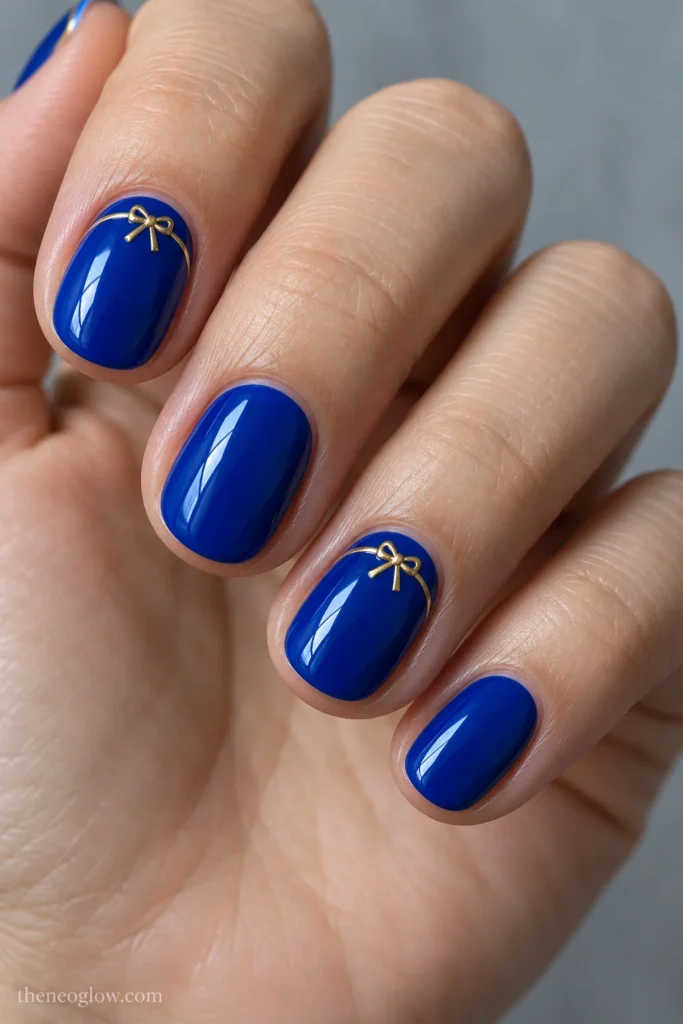
Short oval nails in glossy, opaque ultramarine blue carry a fine metallic-gold arc above the cuticle on two accent fingers. At the midpoint of each arc, the line twists into a tiny, fully flat gold bow with two short tails pointed upward. The bow is part of a reverse cuff, leaving the central nail blue. It feels structured without requiring an extended free edge.
9. Diagonal Plum Bow Trails on Coral Jelly
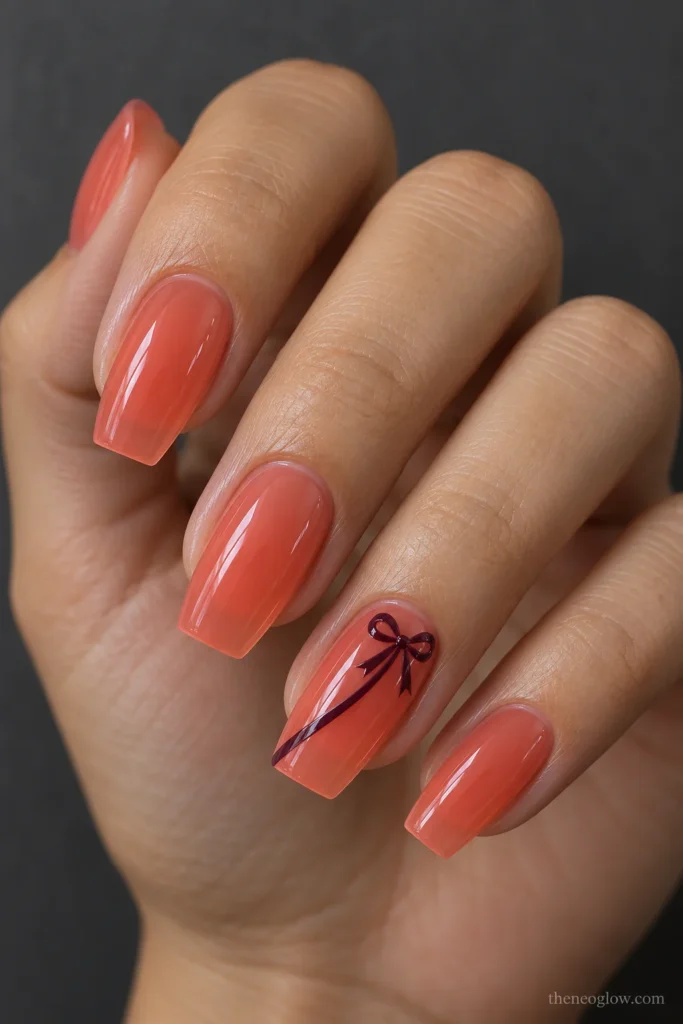
Medium coffin nails wear transparent coral jelly. Sweep one thin plum ribbon line diagonally across each ring nail, then finish its upper endpoint with a small plum bow and two tapered ends. Keep the diagonal line unbroken and leave the other nails plain coral. This moving side-to-tip composition looks different from crossed gift-wrap bands or a repeated central bow.
10. Lavender Nails With a Clear Bow Window
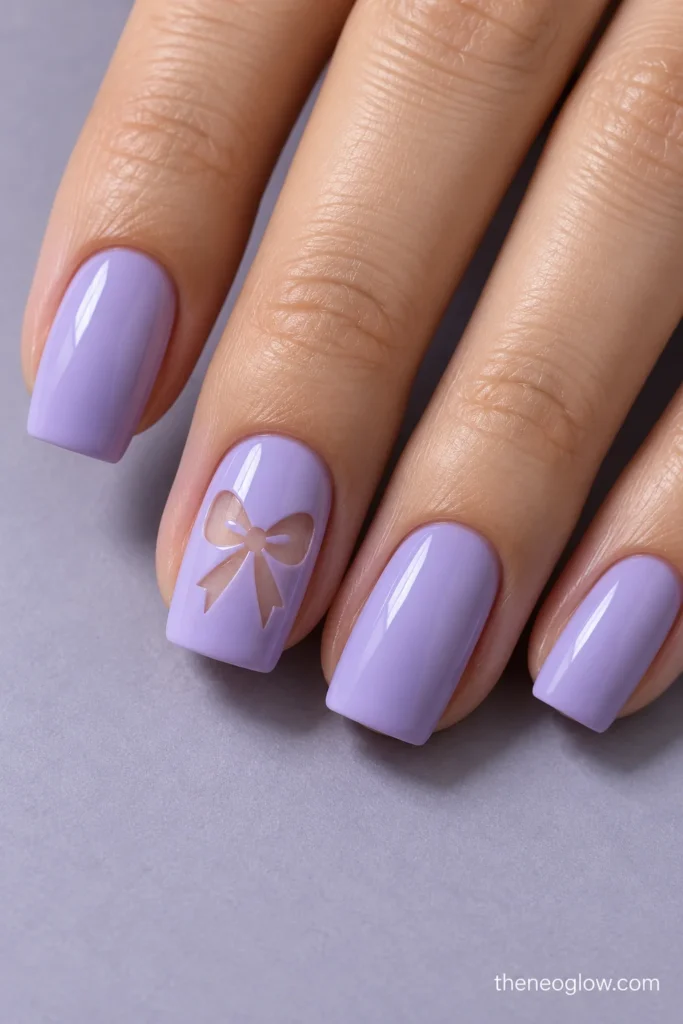
Cover medium square nails in opaque cool lavender cream, except for a transparent bow-shaped window centered on each middle nail. The negative-space cutout has two distinct loop holes, a small knot, and short ribbon tails; the clear portions reveal a natural-looking base. Sharp edges and solid lavender around the opening matter more than extra decoration. This is best treated as precise masked artwork.
Texture, Chrome, and Dimensional Accents
11. Glossy Onyx Bows on Matte Black
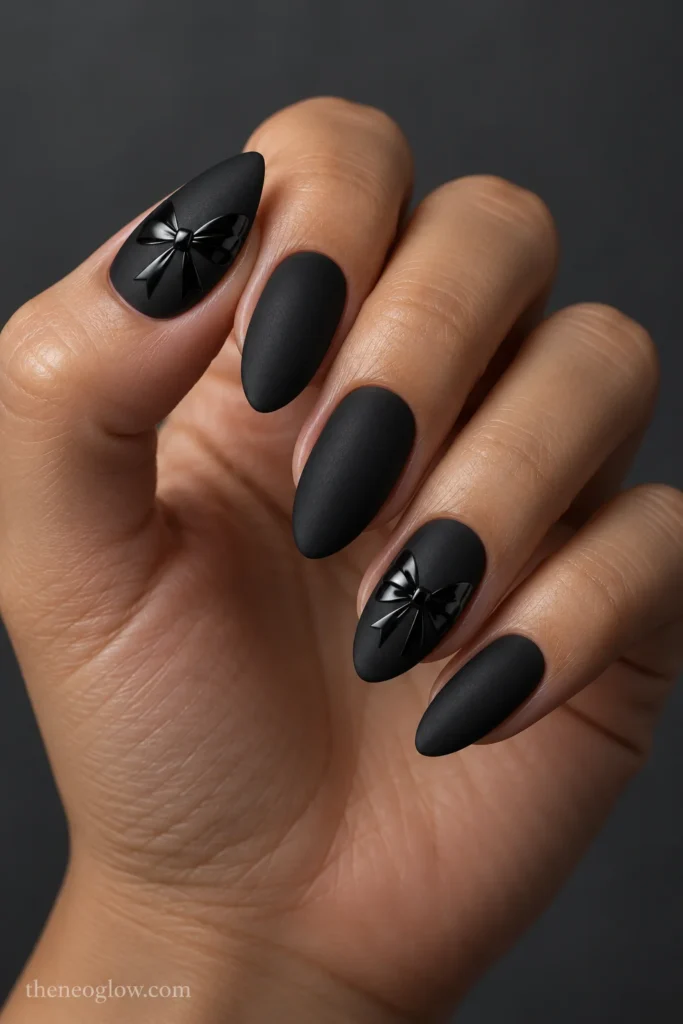
Medium almond nails receive an opaque near-black matte finish. Paint larger, low-profile black bows with clear glossy polish on the thumb and ring nail, placing their knots in the lower middle and their broad loops toward the sidewalls. The tone stays monochrome; the contrast comes entirely from reflected light. Photographing the surface at a slight angle helps show the bows.
12. Faux-Pearl Dotted Bows on Sunflower Yellow
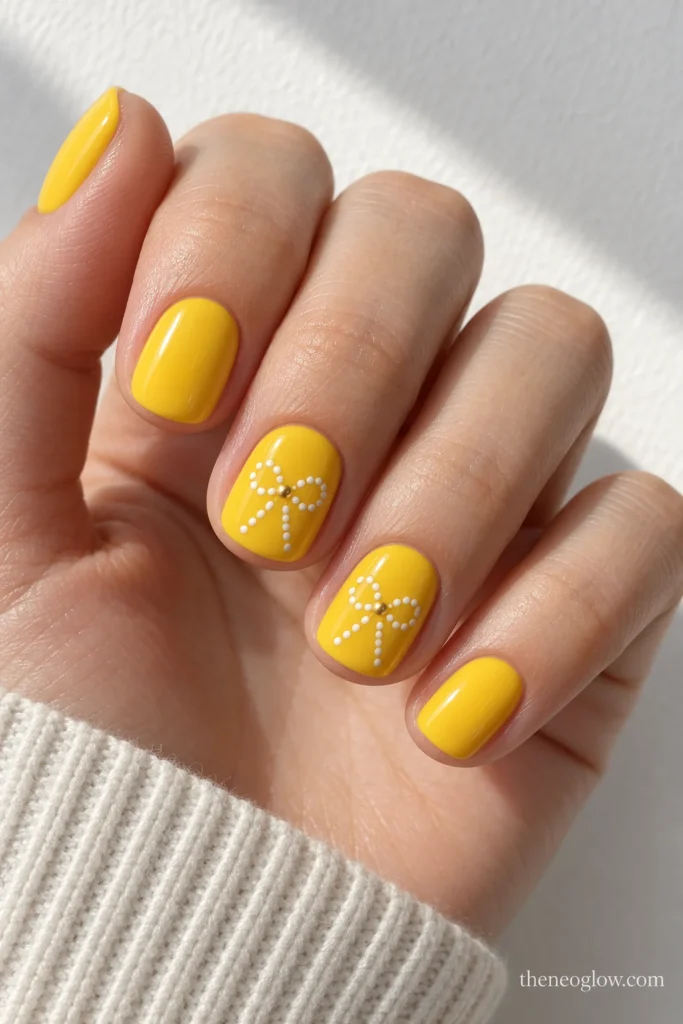
Choose short squovals in solid glossy sunflower yellow. On the middle and ring nails, build each bow from a chain of tiny opaque ivory dots forming two loops, joined by one painted champagne-gold center dot. Add two dotted tails that descend a short distance. These are flat painted pearl effects, not glued beads, so the bow stays smooth rather than becoming jewelry.
13. Silver-Chrome Bows on Powder Blue
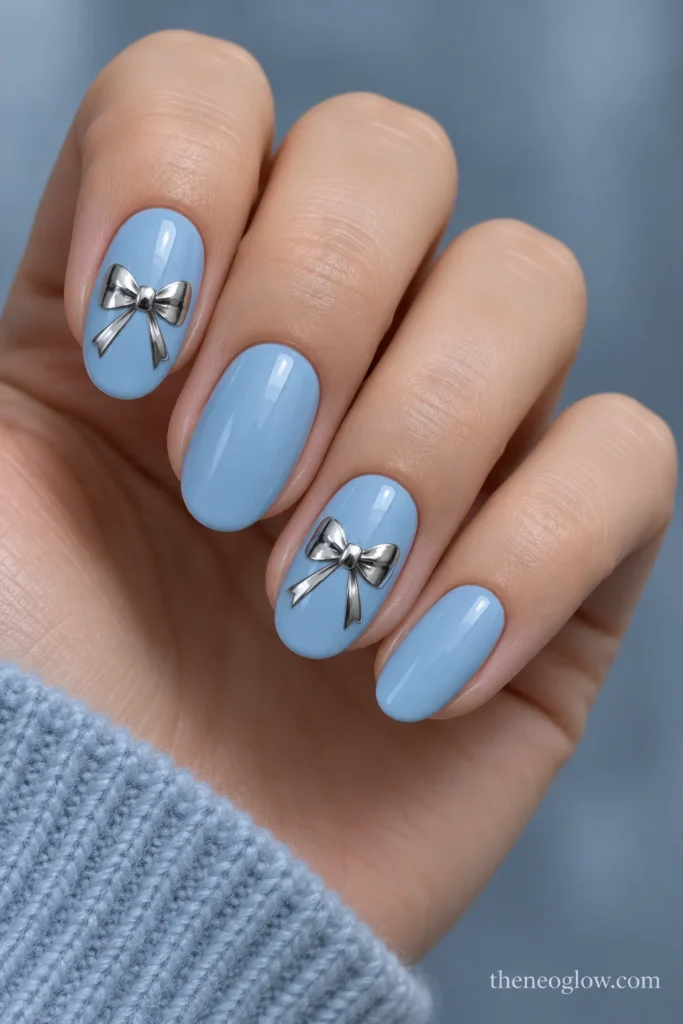
Medium oval nails in opaque powder-blue cream carry a single continuous silver-mirror bow on the index and ring fingers. Give each knot a narrow waist and each loop a wider reflective ribbon shape; keep the metallic finish inside the bow, not across the entire nail. A solid mirror reflection separates this from glitter, scattered foil flakes, or an ordinary silver painted outline.
14. One Raised Blush Bow on Forest Green
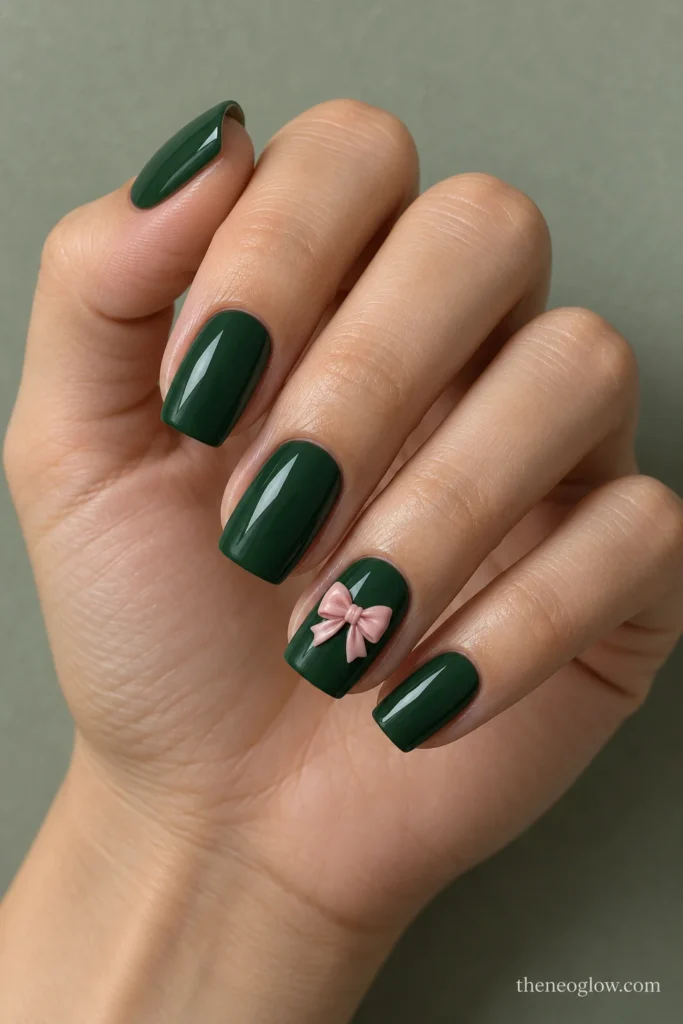
Use medium soft-square nails with opaque glossy forest-green polish. Attach one small, low-profile molded blush bow at the center of a ring nail, leaving every other nail plain. The pale piece should fit inside the nail’s sidewalls and never cover the cuticle or project beyond the free edge. This is the one deliberately raised option; painted versions suit routines where charms may snag.
15. A Split Terracotta Bow Across Two Nails
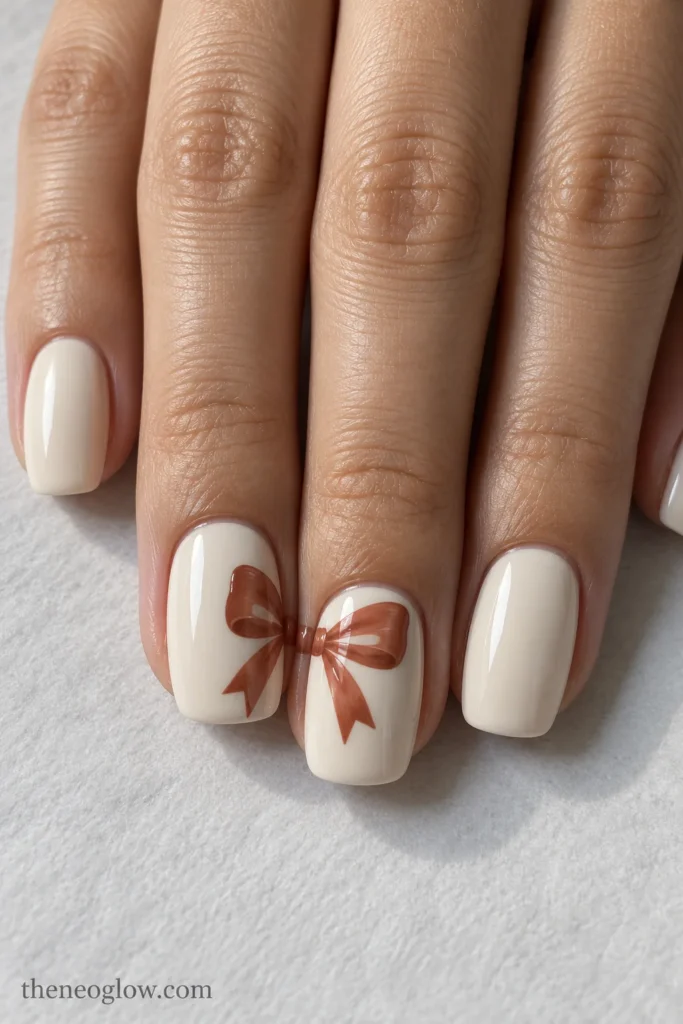
Paint medium rounded-square nails in glossy oyster cream. On the adjacent middle and ring fingers, create one oversized flat terracotta bow: the left loop occupies the right edge of the middle nail, the right loop occupies the left edge of the ring nail, and the small knot appears where the fingers meet visually. Each nail carries a short tail. The complete bow appears when the two fingers sit together.
16. Gossamer Mauve Bows in Smoke Jelly
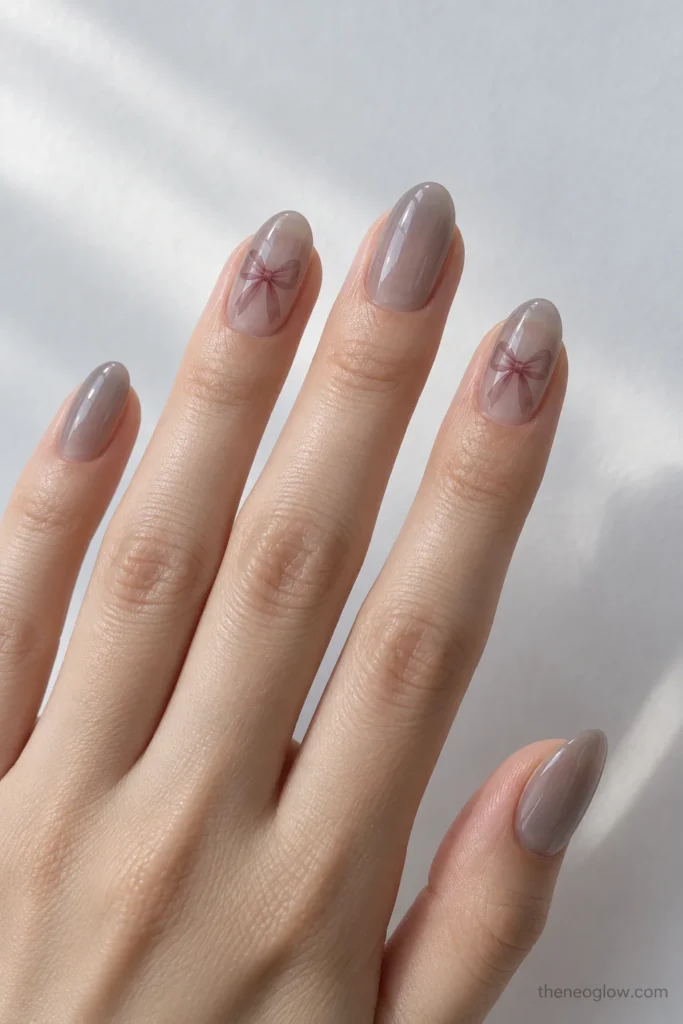
Medium ovals have a translucent cool smoke-gray jelly base. Center a pale mauve bow on the index and ring fingers using softly transparent filled loops, then define the knot and tail edges in a slightly stronger mauve. The layered transparency suggests a sheer fabric ribbon, unlike the solid raspberry bows in Idea 2. Keep the contours clean so the bow remains recognizable.
One More Graphic Option and a Holiday Variation
17. Copper Corner Bows on Aubergine Coffins
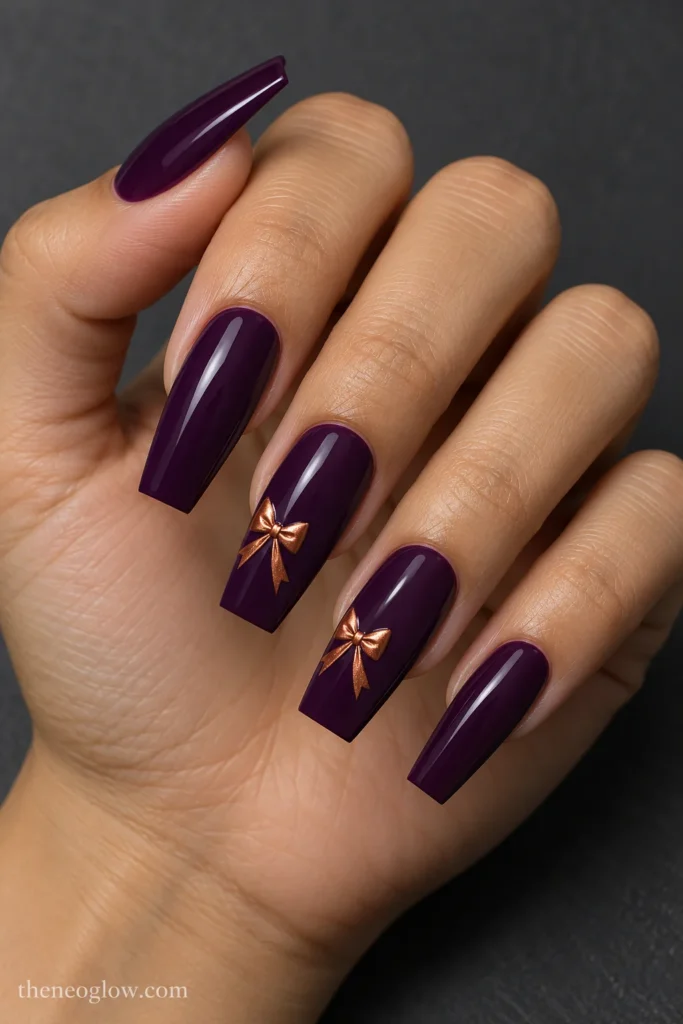
Long tapered-square nails wear glossy, fully opaque aubergine. At the lower left corner of the middle and ring nails, paint one compact copper-metallic bow with sharply creased triangular loops and two short tails pointed diagonally toward the center. The low placement and angular metal shapes contrast with the airy ink corner bow in Idea 1. No raised hardware is needed.
18. Evergreen Bows on Oyster-Pearl Squares
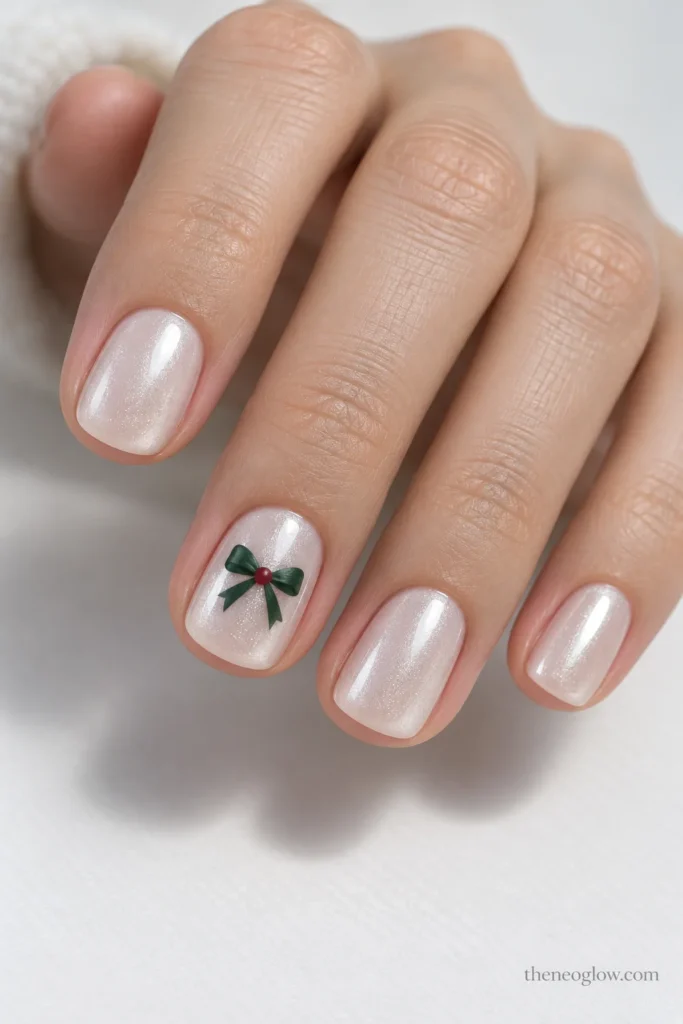
Short rounded-square nails get a softly reflective oyster-pearl finish. Place one flat forest-green bow on the center of each middle nail, with two pointed loops, a tiny cranberry-red center knot, and narrow green tails. The restrained red-green contrast makes this a Christmas bow nails option without adding snowflakes, candy canes, or gift-box illustrations. For more complete holiday manicure routes, explore NeoGlow’s Christmas nail ideas.
Painted Bow, Decal, or Charm?
Painted linework gives you control over loop width, tail length, and exact position. It is especially suited to small nails and asymmetrical designs. A fine detail brush helps, but the bow should be drawn simply enough that both loops stay visible.
Flat decals can provide repeated, uniform bows if their size suits the nail. Check that the decal lies fully on the nail surface and follow the directions for its compatible topcoat. A decal designed for a longer plate may wrinkle or overwhelm a short one.
Small raised charms create a distinct side profile. Before choosing one, think about hair washing, typing, gloves, and clothing that might catch it. Use only nail products intended for the selected system and follow their attachment and removal directions. The FDA’s nail-care product guidance explains why labels, ventilation, warnings, and ingredient information matter with home and salon products.
For regular polish, work from a clean base and allow your color layers to set before detailing; NeoGlow’s at-home manicure routine covers the basic prep and removal sequence. Gel and enhancement systems need their own curing and removal instructions. Never pick or pry off a coating or bow attachment; if gel is involved, the AAD’s gel manicure care advice provides deeper guidance on UV exposure and removal.
How to Describe the Bow You Want
Instead of asking for “cute bow nails,” identify the nail length and shape, base opacity, loop size, placement, technique, and finish. A useful request is: “Short squoval, translucent ivory gloss, one tiny flat black bow at the outer tip corner of the index and ring nails. Open loops, short tails, no raised pieces.”
If a reference uses long extensions, adapt the bow before copying the length: retain the center knot, simplify the loops, and remove unnecessary ribbon tails. Check the image in normal hand position, not only in an extreme close-up. If the bow disappears at a glance, make the contrast clearer rather than adding more motifs.
Save the Bow, Not Just the Color
For an everyday manicure, Ideas 1, 3, 5, and 8 keep bows flat and scaled to short nails. For a more expressive result, try the bow-shaped French of Idea 7, mirror finish of Idea 13, or connected two-nail design of Idea 15. Save the exact idea showing your preferred loop geometry and placement, then decide whether you want it painted, applied as a flat decal, or worn as one small event accent.