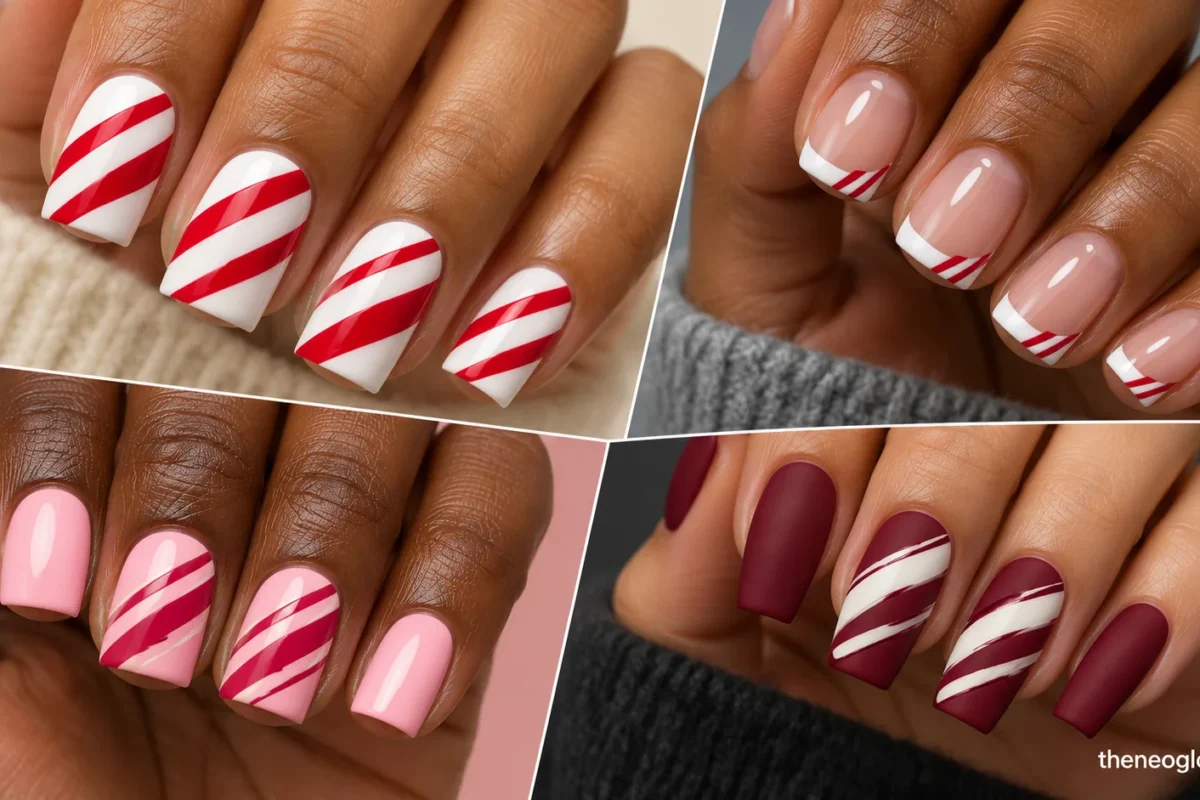
Candy cane nails can be as simple as two tiny red-and-white stripes or as detailed as a full peppermint-inspired French manicure. The challenge isn’t finding a festive color combination. It’s getting the stripe width, spacing, and placement right for the nails you actually wear.
A broad diagonal stripe can look beautiful on medium square nails but overwhelm a short round nail. A striped French tip needs enough room for both colors to remain visible, while a pink candy-cane design depends on contrast that doesn’t disappear into the background.
These 18 candy cane nail ideas explore full stripes, narrow borders, French tips, pink variations, glitter, and deeper holiday colors. Each has a specific shape, finish, and placement so you can recreate the design without guessing which details matter.
Find the Candy Cane Design That Fits Your Nails
| What you want | Design direction | Start with |
|---|---|---|
| Traditional Christmas stripes | Red and white bands across the nail | 1, 3 |
| Small, practical details | Micro lines, side borders, or cuticle stripes | 2, 4, 6 |
| More open nail space | Floating stripe accents | 5 |
| Candy cane French tip nails | Striped edges with a clean base | 7–12 |
| Pink candy cane nails | Raspberry, rosewater, and fuchsia variations | 13–15 |
| More detailed holiday artwork | Hook cutouts, glitter, or matte contrast | 16–18 |
The most important choice is how much space the stripes should occupy. On a short nail, two well-separated marks often look clearer than five tiny lines. Medium nails can support a wider striped French tip, while longer shapes offer room for more elaborate patterns.
For a larger mix of holiday colors and motifs, explore NeoGlow’s 27 Christmas nail ideas. This guide stays focused on candy-cane stripe construction and placement.
Classic Candy Cane Nails With Different Stripe Placements
The traditional combination is recognizable because of its clean red-and-white contrast. Changing the stripe direction, width, or occupied area makes a much bigger difference than simply choosing another red polish.
1. Classic Peppermint Band Squares
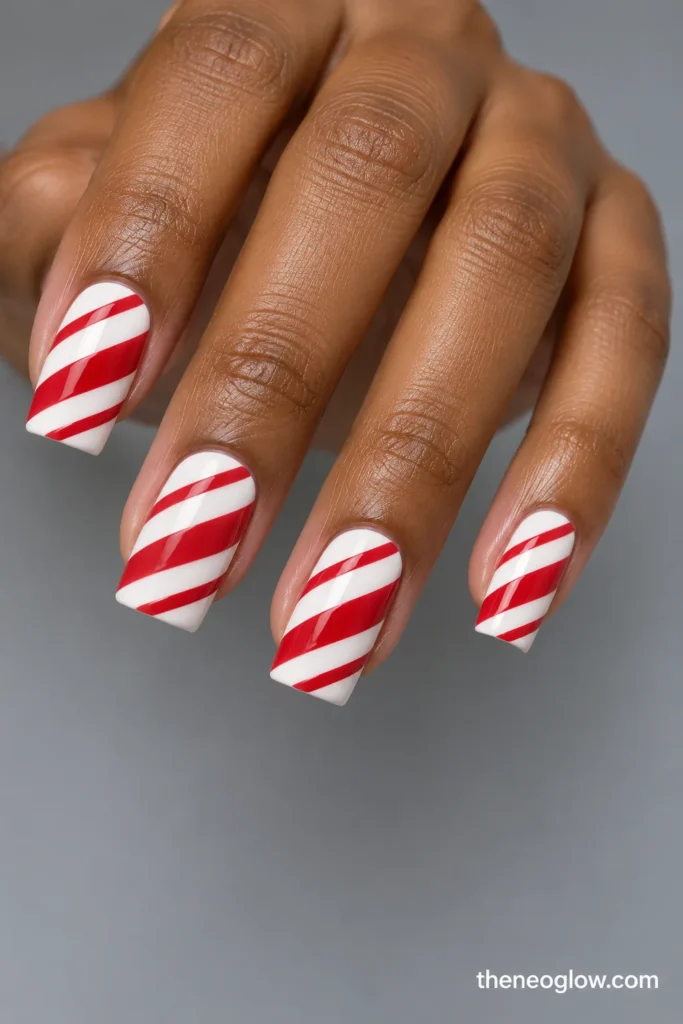
Medium square nails carry an opaque warm-white base with three scarlet diagonal bands crossing each nail. Make the central red band wider than the two outside bands, leaving generous white gaps between them. Finish with a smooth, high-gloss topcoat. The full-width pattern and straight free edges give this set its unmistakable peppermint-candy appearance.
This design suits someone who wants the candy cane pattern to dominate the manicure. Its alternating stripe widths are intentional: equal-width red lines can feel more like ordinary striped fabric. A liner brush or carefully applied striping guides can help establish the angle, but keep the base completely dry before adding another color.
2. Micro Candy Rails on Short Rounds
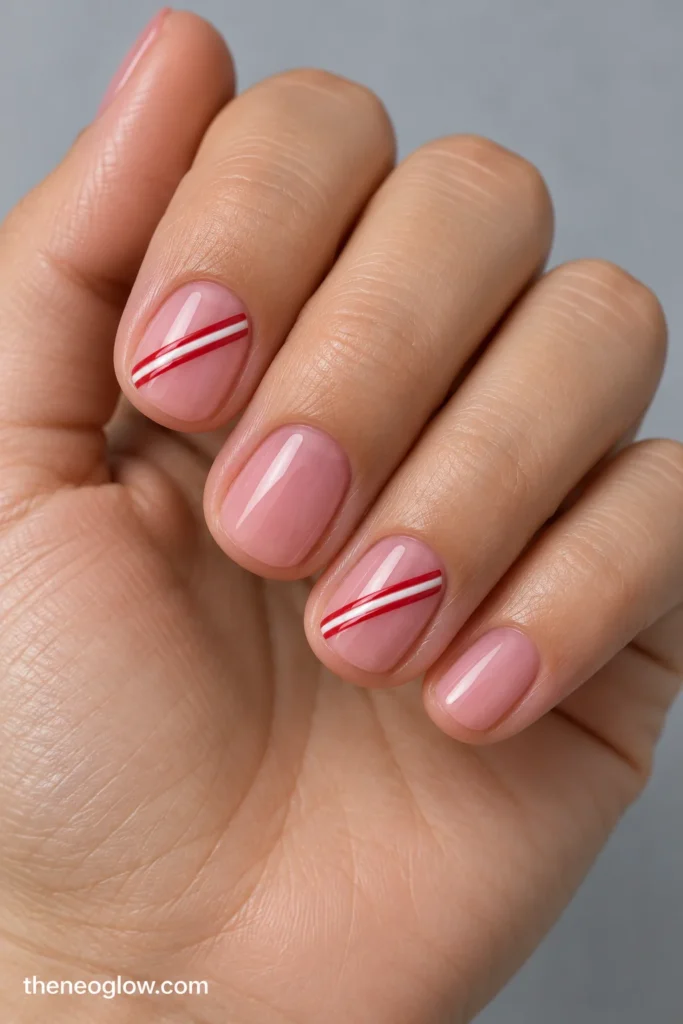
Very short natural round nails get a semi-sheer rosy base. On the index and ring fingers, place two hair-thin scarlet diagonal lines across the center, separated by one narrow ivory line. Leave the remaining nails uninterrupted rosy gloss. The three fine marks form a miniature candy stripe without requiring extra nail length.
This is a practical choice when your nails barely extend beyond the fingertips. Keep the stripes parallel and positioned away from the cuticle, where crowded detail becomes harder to read. Rather than shrinking an entire candy-cane illustration, the design reduces the motif to its clearest repeating feature.
3. Barber-Pole Center Tracks
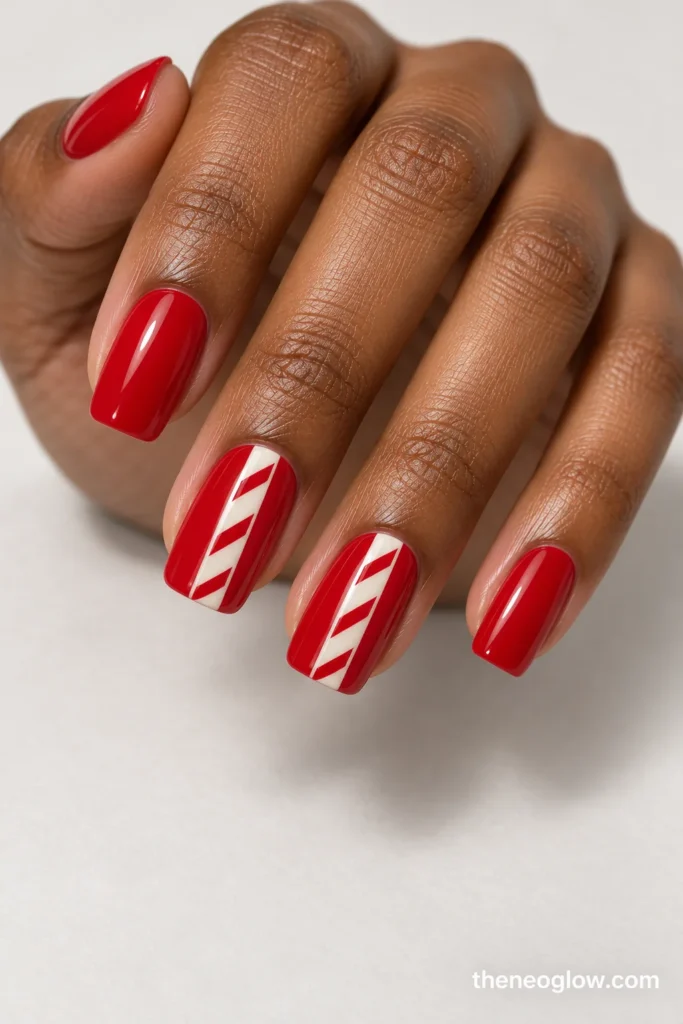
Paint medium squoval nails glossy cherry red. On the middle and ring fingers, reserve one narrow, straight ivory column running from near the cuticle toward the tip. Inside that column, add three short crimson diagonal stripes at matching angles. The other nails stay solid cherry red.
The pattern resembles the twisting stripes around a candy cane without wrapping the entire nail. The vertical ivory column should have crisp parallel edges, while the red diagonal sections remain contained inside it. This controlled center placement suits a salon manicure because precise border work matters more than the number of colors.
4. Ivory Nails With Sidewall Candy Ladders
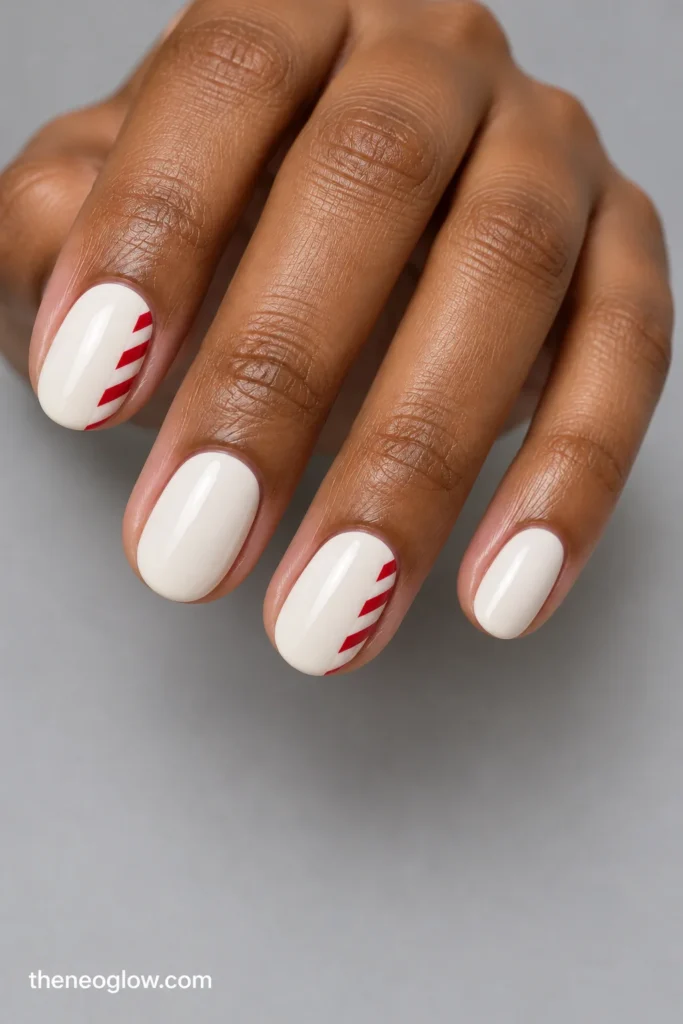
Start with opaque soft-ivory polish on medium oval nails. Along the outer sidewall of the thumb and ring finger, add three short crimson diagonal strokes arranged from lower to upper nail. Each stroke begins near the same side edge and stops before reaching the middle. The other nails remain plain ivory.
The open center gives this design a quieter appearance than full candy-cane stripes. Unlike tiny marks confined to one tip corner, this narrow ladder occupies much of one side of the nail. It works particularly well when you like visible Christmas art but don’t want alternating colors covering every finger.
5. Floating Peppermint Sashes
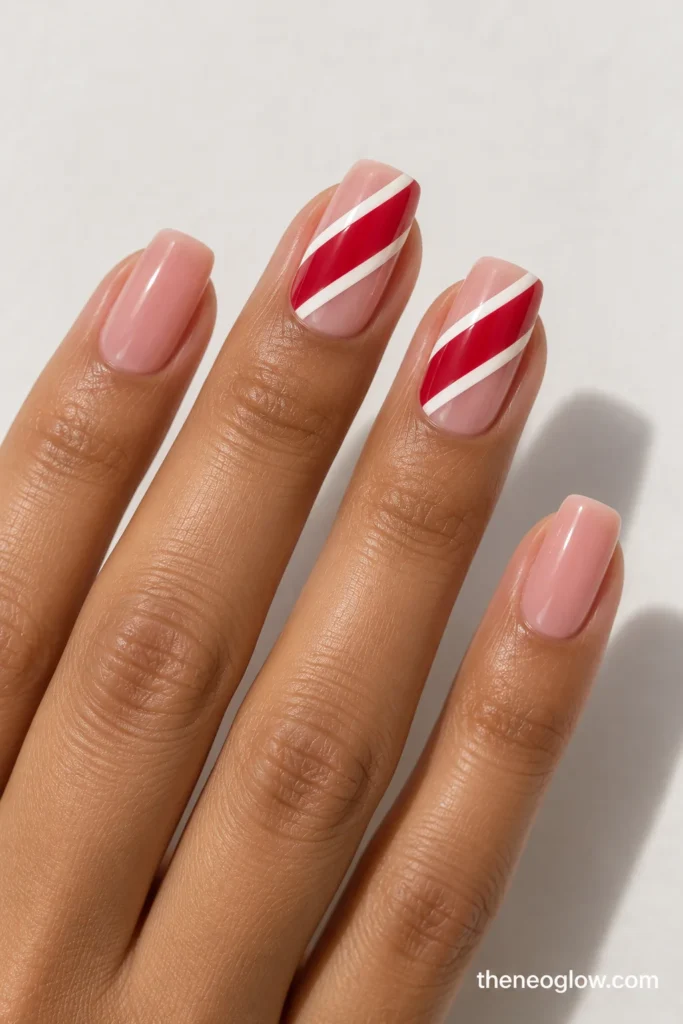
Medium soft-square nails have a sheer peach-pink base. Across the middle and ring nails, paint one broad scarlet diagonal sash from the lower left toward the upper right. Add a narrow opaque ivory line immediately along each long edge of the sash, leaving the surrounding nail translucent. The remaining fingers keep the clean base.
The red ribbon and its two white borders form one floating candy-inspired feature rather than a repeating all-over pattern. The broad central stripe should be noticeably wider than either white outline. If the borders touch or become uneven, the manicure loses the deliberate layered effect, so this design benefits from a clear reference photograph.
6. Candy-Cane Half-Moon Arcs
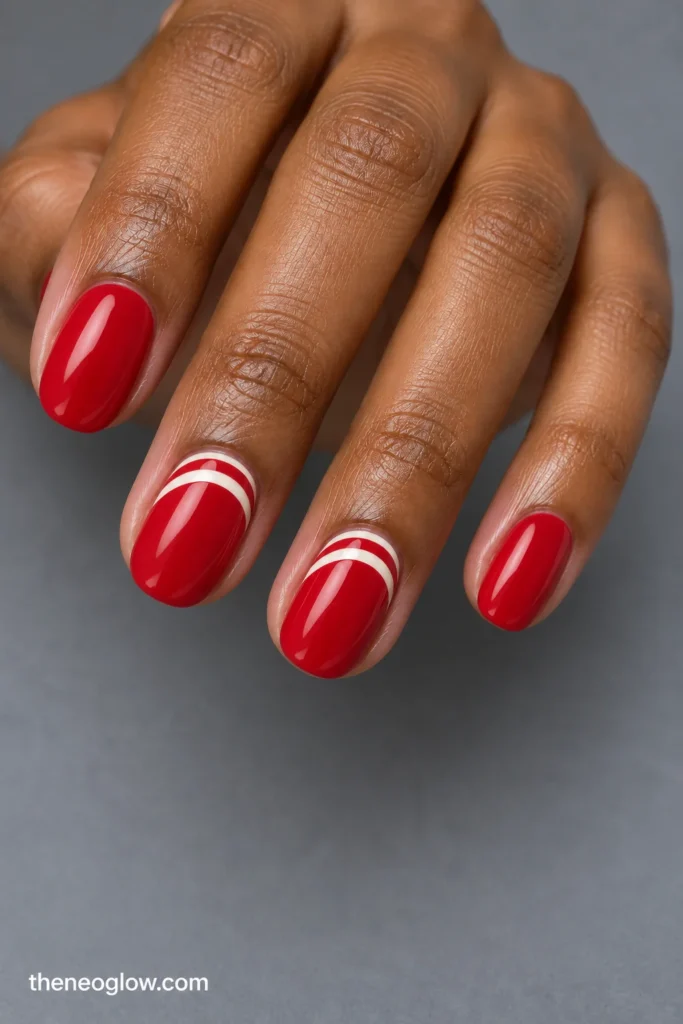
Short oval nails wear opaque glossy ruby red. On the middle and ring fingers, place a curved ivory half-moon band just above the cuticle, followed by a second thinner ivory arc slightly farther up the nail. Preserve a visible red gap between the two curves. Other nails remain solid ruby.
These are candy-cane stripes translated into concentric cuticle arcs, not French tips. Following the rounded base of the nail gives the pattern a different direction from the usual diagonal lines. Keep the upper arc shallow enough that most of the ruby-red nail remains visible.
Candy Cane French Tip Nails: Six Different Constructions
French tips offer a clean way to wear the peppermint pattern because the nail bed remains relatively open. The important decisions are tip depth, smile-line direction, and how many stripes will fit inside the colored edge.
7. Scarlet Slashes on Porcelain French Tips
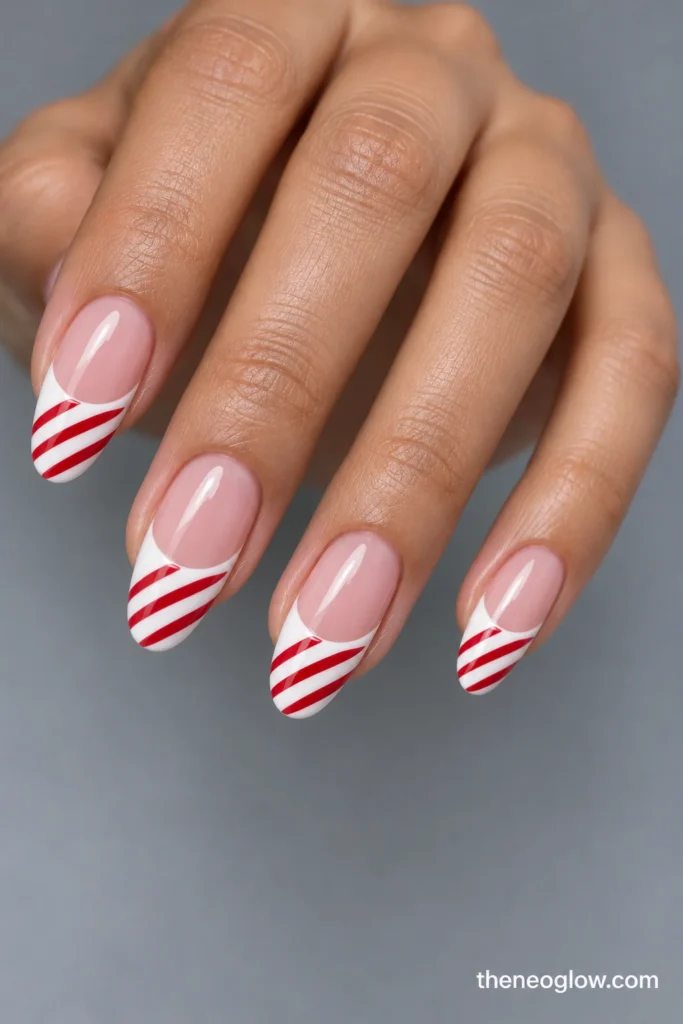
Medium almond nails begin with a sheer neutral-pink base. Paint a moderately deep, opaque porcelain-white French tip following each curved free edge. Add three narrow scarlet diagonal stripes within the white tip, all leaning in the same direction. The stripes stop cleanly at the smile line and do not continue into the pink nail bed.
This is a classic candy cane French tip with enough room for every red stripe to stay visible. Ask for a deeper tip than a standard micro French, especially on narrower almonds. For a successful result, the white background must remain recognizable between the red marks rather than disappearing under the pattern.
8. Tiny Peppermint Edge Rails
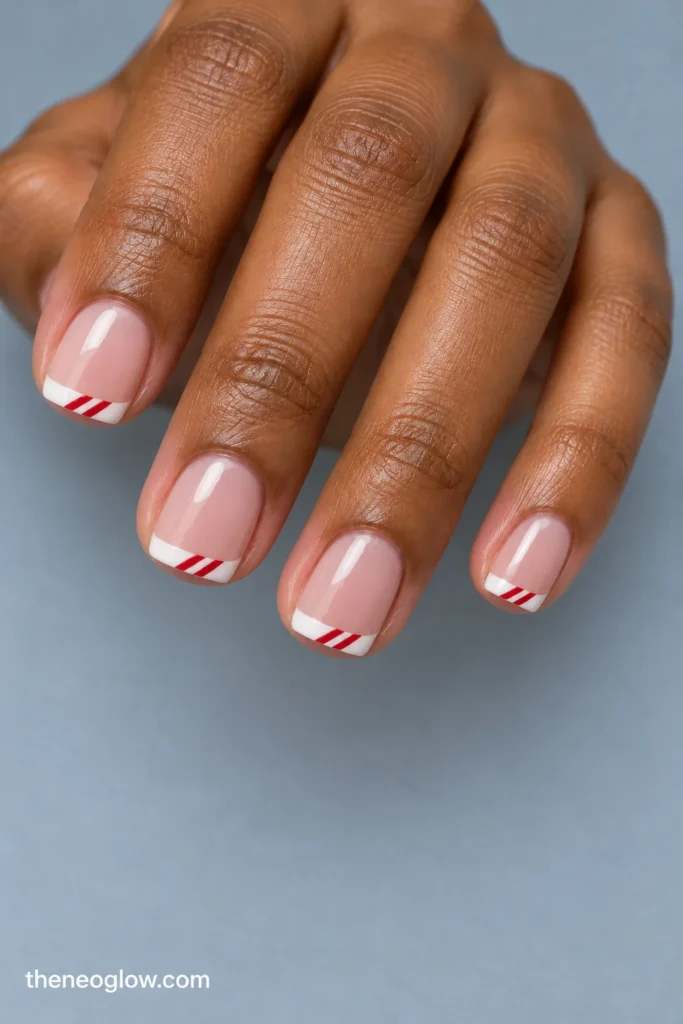
Short squoval nails keep a glossy, sheer nude-pink base and a very shallow opaque white French edge. Across the white band, add two miniature scarlet diagonal slashes per nail, with visible white remaining between them. The tip follows the naturally straight free edge rather than an exaggerated curved smile.
This smaller design offers the candy-cane effect without adding length. Avoid trying to fit three or four lines into a narrow tip that cannot hold them. Two clean marks are enough when the contrast is strong, and the rest of the nail remains simple enough for everyday wear.
9. Half-and-Half Candy French Squares
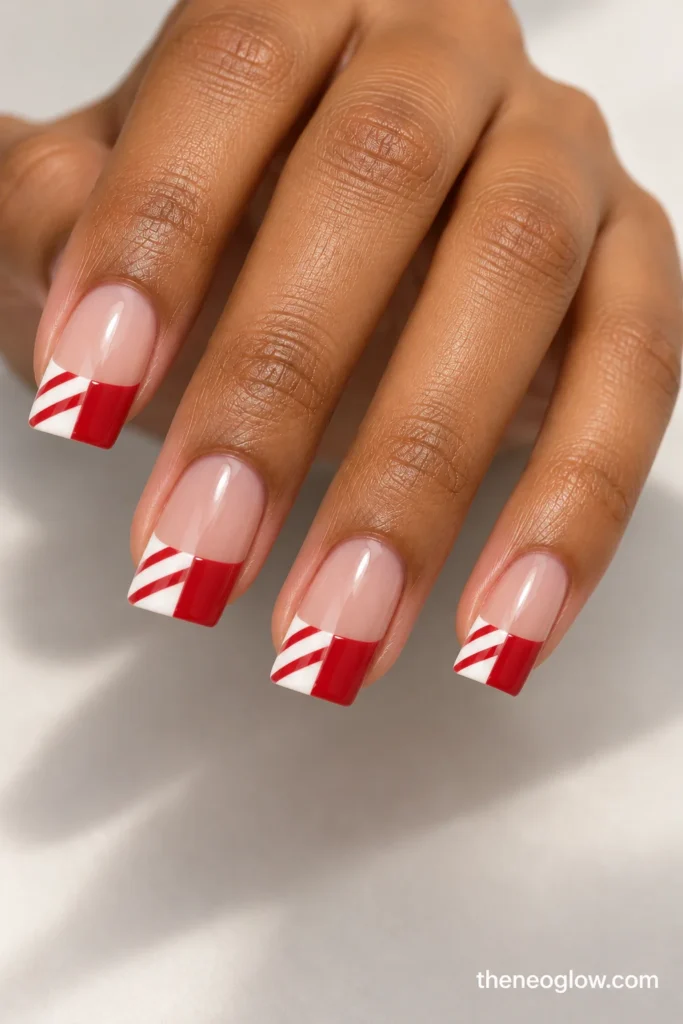
Use medium soft-square nails with a transparent beige-pink base. Split each French tip into two equal sections: the left half is opaque ivory with two short scarlet diagonal stripes, while the right half is solid glossy scarlet. A clean vertical division separates the patterned and unpatterned halves.
This geometric version uses asymmetry within an otherwise straight French tip. Unlike a fully striped edge, it deliberately leaves half the tip as a single red block. Keep the division centered and the striped half large enough for the two red marks to remain distinct.
10. Angled Peppermint Sweep Tips
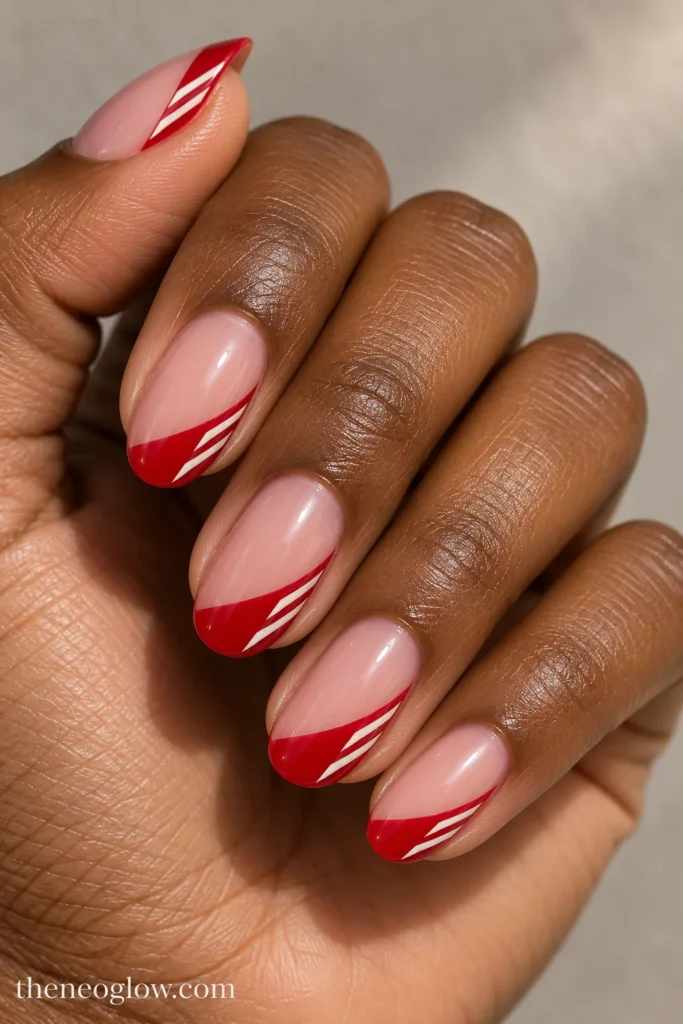
Medium oval nails have a translucent blush base and a scarlet French tip that rises higher on the right side and slopes down toward the left. On the taller red section, add two narrow ivory diagonal ribbons running parallel to the sloped tip edge. The rest of the red cap stays smooth and unpatterned.
The tilted smile line makes this different from a traditional symmetrical French manicure. It draws attention toward one side of each nail while keeping the candy pattern contained at the edge. A technician can reverse the direction on the opposite hand for a balanced overall look, but both sides should use the same stripe widths.
11. Peppermint Chevron French Almonds
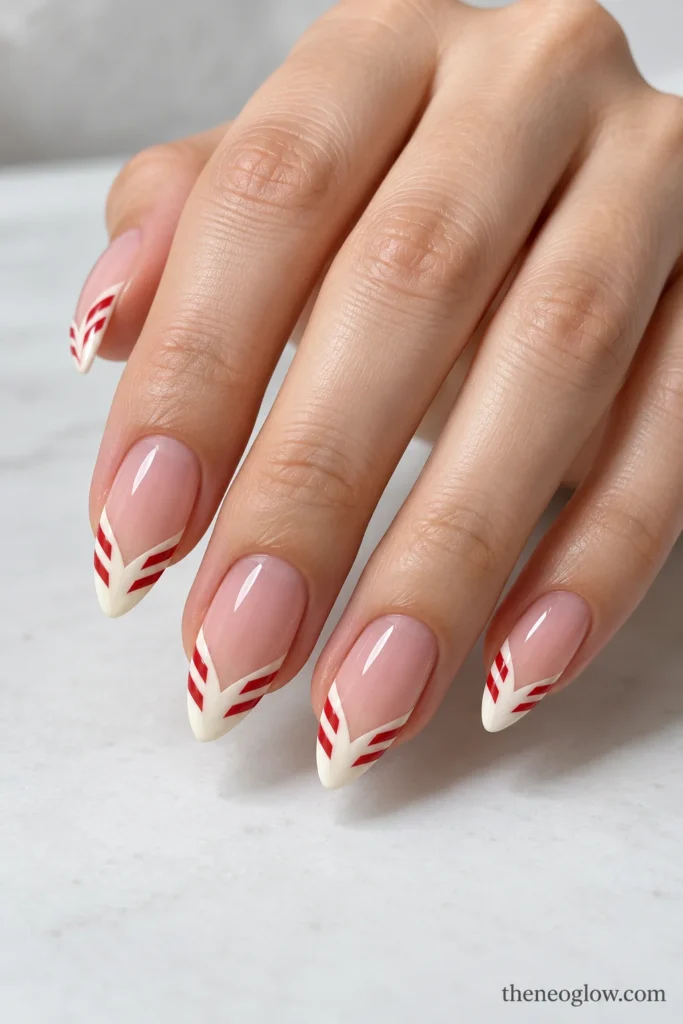
Medium almond nails wear a glossy sheer warm-pink base with a deep ivory V-shaped French tip. The two ivory sides meet at a crisp point near the center of the free edge. Add two short scarlet diagonal lines across each side of the V, keeping the central ivory point visible.
This design combines candy-cane striping with a sharper geometric tip. The V shape must remain recognizable; allowing the red strokes to run into the transparent base would turn it into a different manicure. It is better suited to a skilled nail artist than a first attempt with regular polish.
12. Mirror-Ruby Peppermint French
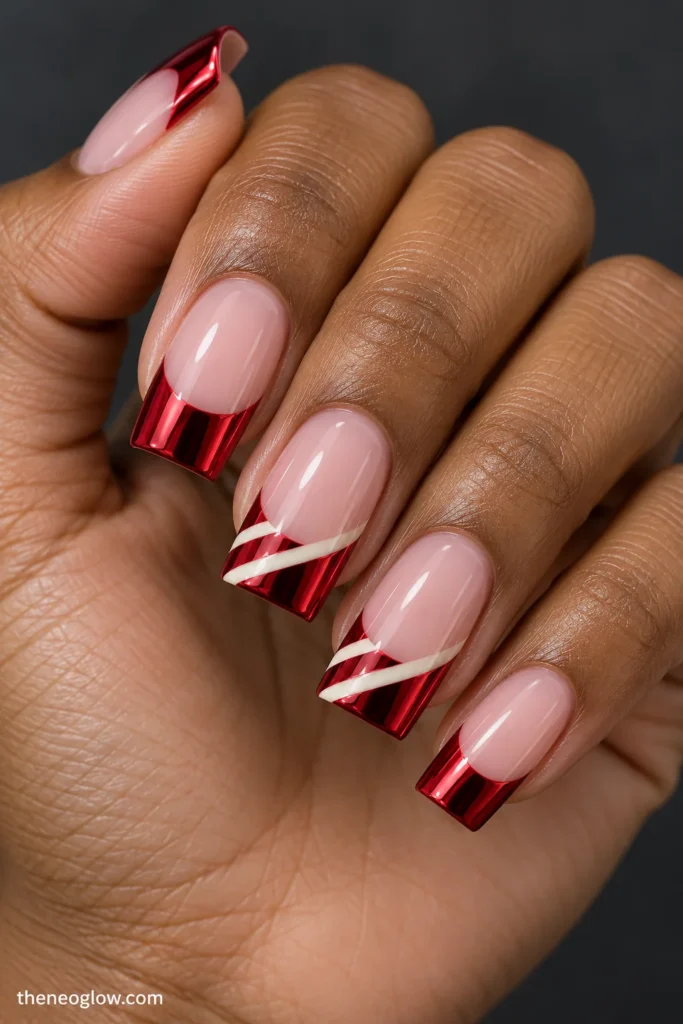
Medium tapered-square nails start with a sheer cool-blush base. Their broad French tips have a reflective ruby-red mirror-chrome finish. On the middle and ring fingers, two crisp opaque ivory diagonal bands interrupt the metallic tips. The remaining nails wear the uninterrupted ruby-chrome French edge.
The difference here is the reflective surface. Ruby mirror chrome catches light more sharply than a glossy red cream, while the white stripes remain flat and clearly defined. This is a salon-oriented design: a chrome effect needs a compatible product and application system, and an ordinary red shimmer polish will not produce the same mirror appearance.
Pink Candy Cane Nails and Statement Stripe Designs
Pink can soften the traditional peppermint palette or make it brighter and more playful. The following designs keep the candy-cane structure visible while changing the color relationship, the finish, or the actual shape of the motif.
13. Powder-Pink Raspberry Stripe Blocks
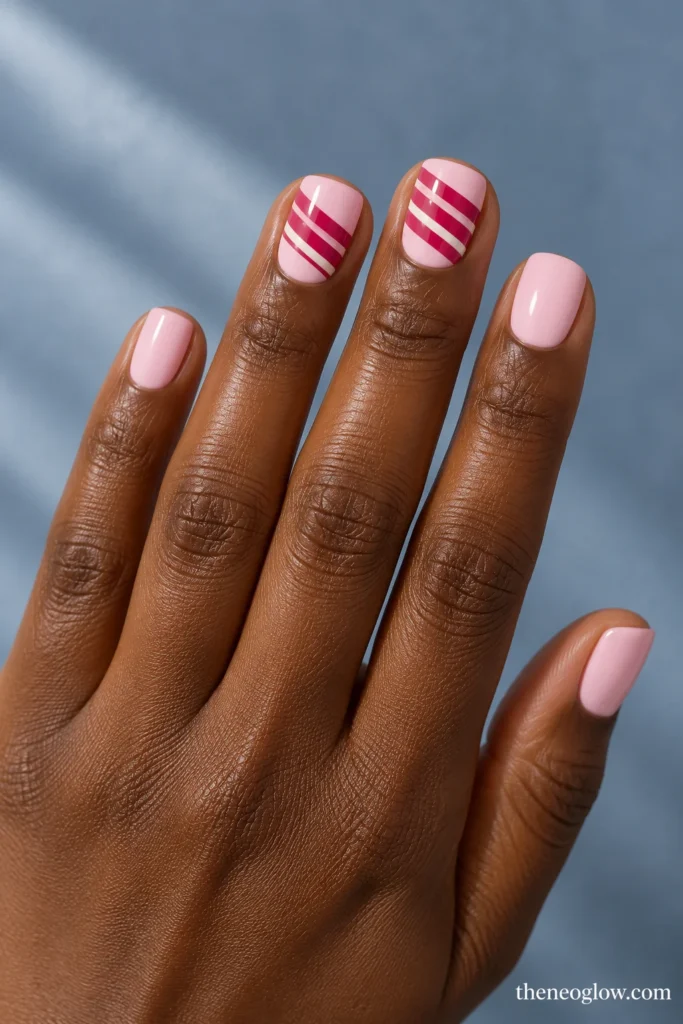
Short square nails wear opaque powder-pink cream. On the middle and ring fingers, place three medium-width raspberry-pink diagonal bands through the central portion of each nail, with a slim ivory stripe between neighboring raspberry bands. Leave the cuticle and outer tip areas powder pink. All other fingers remain solid pastel pink.
The contrast between the saturated raspberry and powder-pink base makes this bolder than delicate micro stripes but softer than classic bright red and white. Avoid extending the bands into a French tip; the central striped block is the identifying feature. Choose this design if you want clearly pink Christmas nails without bows, snowflakes, or other motifs.
14. Rosewater Jelly Candy Ribbons
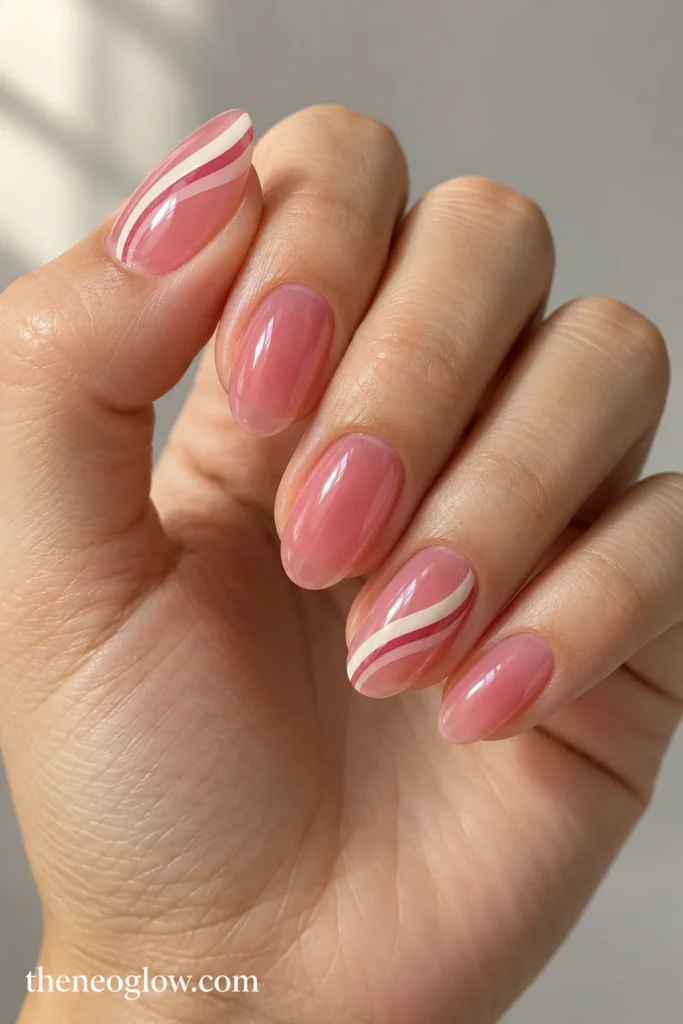
Medium oval nails have a translucent rosewater-pink jelly finish. Across the thumb and ring finger, curve one smooth ivory ribbon diagonally through the center of the nail, then add a slimmer deep-rose line that follows the same curve with a narrow transparent gap between them. Leave the other nails uninterrupted rosewater jelly.
The rounded ribbon shape feels softer than straight candy-cane bands. The jelly background keeps the design light, while the paired ivory and deeper-pink curves establish the striped theme. Keep both curves smooth and consistent; this look depends on a deliberate ribbon outline rather than scattered decorative lines.
15. Fuchsia Peppermint Corner Coils
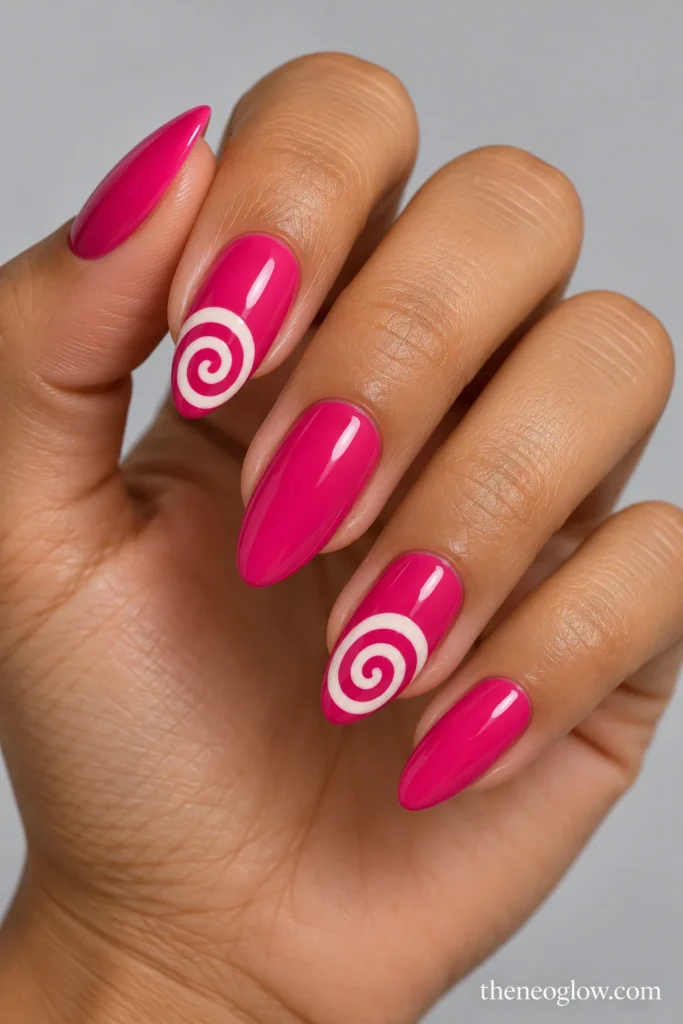
Medium almond nails are coated in glossy, fully opaque fuchsia pink. On the index and ring fingers, add one compact ivory spiral emerging from the outer tip corner and turning inward toward the center. The spiral makes approximately one and a half turns, with a clear fuchsia gap between its curved white sections. All remaining nails stay solid fuchsia.
This is an off-center candy swirl, not a complete round peppermint disc. The corner placement and single continuous spiral keep it distinct from full-nail pinwheel artwork. Allow the pink background to remain visible around the coil so the detail looks intentional rather than like a white patch.
16. Negative-Space Candy-Cane Hooks
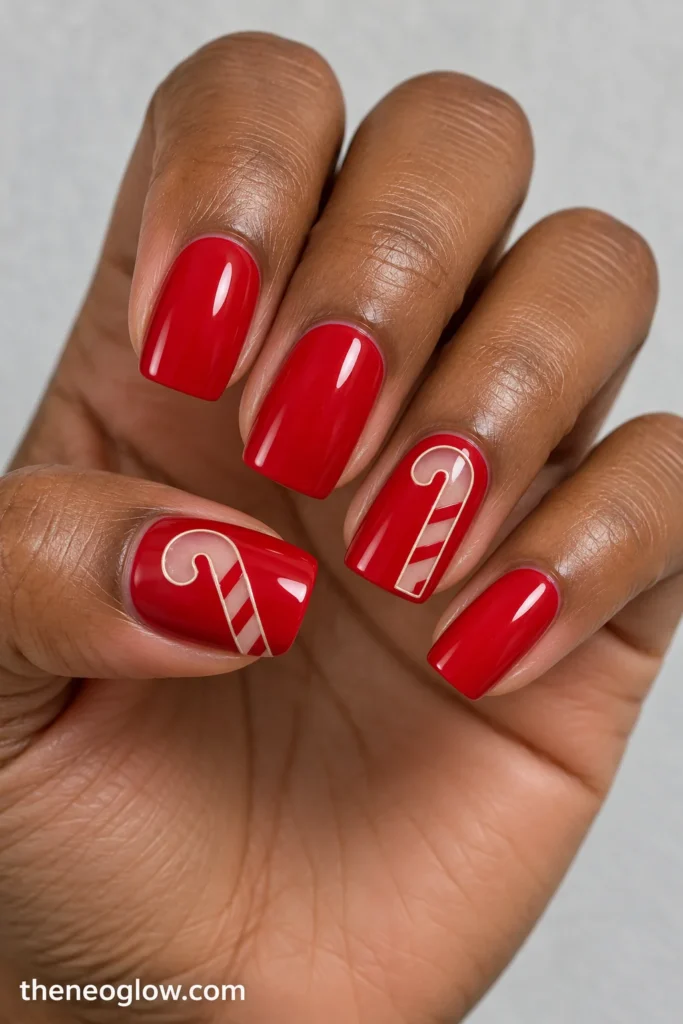
Medium soft-square nails have an opaque glossy scarlet-red base. On the thumb and ring finger, create one slender transparent candy-cane silhouette with a rounded hook at the top and a straight lower stem. Outline the transparent shape in fine ivory, then cross its stem with three narrow scarlet diagonal bars. All remaining nails stay solid red.
The candy cane appears as a clear cutout inside the red manicure, giving this illustrated design a different visual structure from surface-painted stripes. The hook must remain recognizable and the transparent interior should reveal the natural-looking nail base beneath. Precise masking or controlled nail-art painting makes this a better salon reference than a quick beginner project.
17. Sugared Peppermint Glitter Lanes
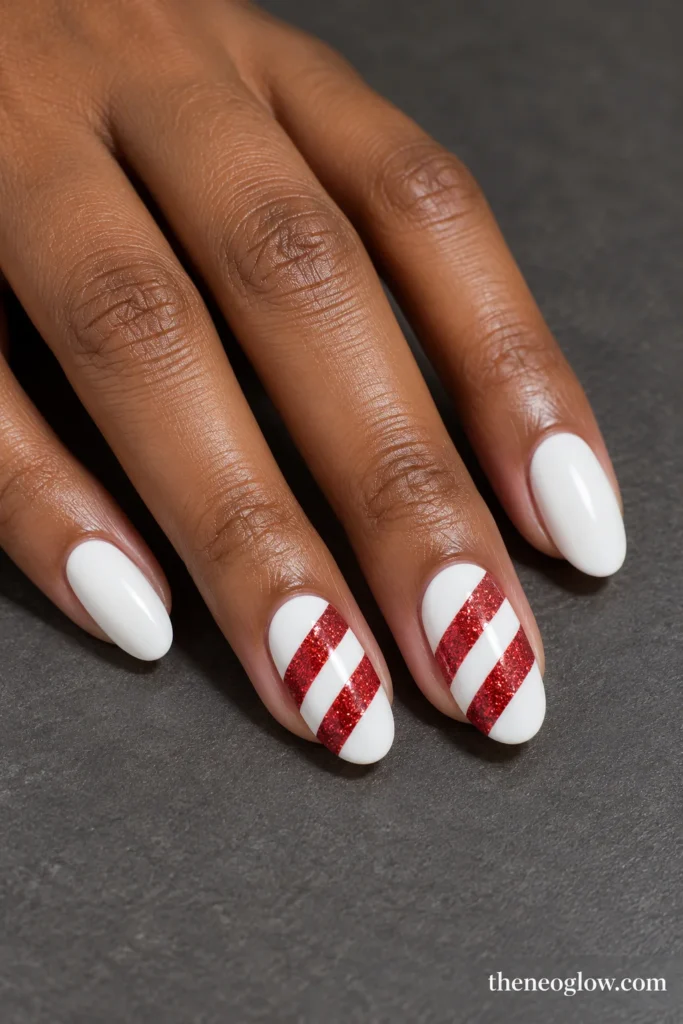
Medium oval nails wear opaque porcelain-white cream with a smooth glossy finish. On the middle and ring fingers, paint two broad scarlet-red fine-glitter diagonal bands, leaving a clean white stripe between them and white margins at both ends. The other nails remain glossy porcelain white.
The concentrated red glitter gives the candy-cane stripes a sparkling, sugar-coated appearance without scattering glitter across the entire nail. Keep the glitter inside the bands and the white spaces completely clean. Fine reflective particles preserve the stripe outline better than large chunky glitter pieces, especially when the manicure is viewed from a normal distance.
18. Matte Merlot Candy Stripes on Coffins
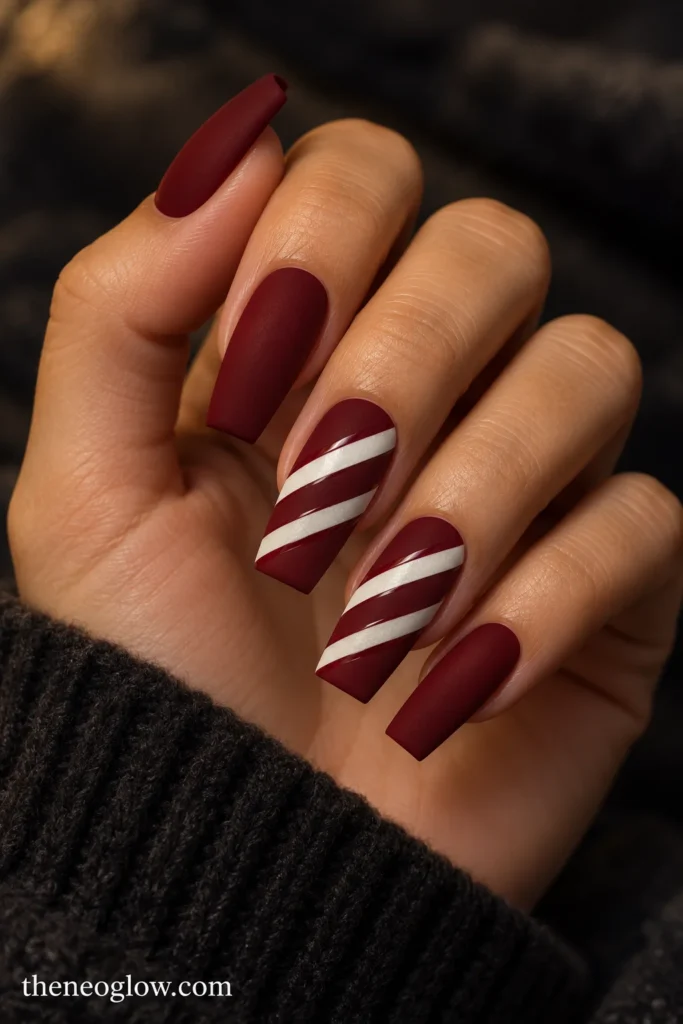
Medium-long coffin nails carry fully opaque deep merlot-red polish with a consistent matte finish. On the middle and ring fingers, paint three crisp pearl-white diagonal bands across the central nail plate, alternating one wider stripe with two narrower ones. Add a very fine glossy merlot edge immediately beside each white band, while the rest of the nail stays matte.
The contrasting surface finishes give this set its dressier character. Unlike rounded candy ribbons, these bands are straight and sharply defined, with a clear repeating angle. Maintain enough spacing for the matte merlot background to show through. This is a strong option for Christmas parties when bright cherry red feels too playful.
How to Make Candy Cane Stripes Look Clean
A striped nail design becomes much easier to understand when you separate four decisions: direction, width, spacing, and placement.
Direction: Traditional candy-cane stripes lean diagonally. Choose one general angle before painting and repeat it across the accent nails. Mirrored designs can also work, but random changes in direction make a repeated pattern look less controlled.
Width: A clear difference between one broad band and a few narrower lines creates more visual interest than a crowded set of identical strokes. On short nails, fewer bands are usually easier to distinguish.
Spacing: Preserve enough of the base color between stripes for the pattern to read. White gaps are part of a classic candy-cane design, not unused space that needs to be filled.
Placement: A French tip, side panel, central sash, and cuticle arc use the same basic stripe language but produce very different manicures. Select the placement that suits your usable nail space before deciding how many lines to paint.
A realistic DIY method for simple stripes
For designs such as 1, 2, 4, or 8, regular nail polish and a fine liner brush may be enough.
- Shape and clean the nails gently, then apply a compatible base coat and your chosen background color according to the product directions.
- Allow regular-polish layers to dry sufficiently before adding detailed artwork. A wet base can drag or smear under the liner.
- Stabilize your painting hand on a flat surface. Make one controlled diagonal line, then use it as a direction guide for the remaining stripes.
- Add the contrasting color only where the design requires it. Avoid repeatedly brushing over lines that have begun to set.
- Once the artwork is sufficiently dry, apply a compatible topcoat with light strokes to reduce smearing.
For even repeated lines, properly used striping guides or suitable nail-art decals can be easier than drawing every mark by hand. Use them according to their instructions, and do not assume the same steps apply to all regular-polish and gel systems.
Chrome finishes, elaborate negative-space hooks, and complex chevron tips require more precision and may be better handled by an experienced nail professional.
Adapting Candy Cane Nails to Short Lengths
Short nails do not need miniature versions of the most detailed designs. A more reliable approach is to preserve the strongest part of the candy pattern and remove anything that would crowd it.
For very short rounds, idea 2 uses three fine marks in one small area. Idea 6 moves stripes toward the cuticle, while idea 8 concentrates two red slashes inside a shallow French edge. Those are three distinctly different ways to use limited nail space.
Short squares have a straighter edge that can accommodate geometric bands, especially ideas 8 and 13. Narrow ovals may look better with a vertical or curved stripe placement, while medium almonds provide additional space for deeper French constructions.
If your main priority is finding designs across different short-nail shapes rather than exploring the candy-cane motif, NeoGlow’s short Christmas nails guide offers a wider range of practical seasonal details.
How to Describe Candy Cane Nails at the Salon
A useful reference tells the technician what the candy-cane pattern actually looks like, not just that you want festive nails.
For idea 7, you could say:
“Medium almond nails with a sheer neutral-pink base, moderately deep opaque white French tips, and three thin scarlet diagonal stripes inside every tip. Keep the stripes off the pink nail bed.”
For idea 12, the important request is ruby mirror-chrome French tips, with two opaque ivory diagonal stripes on only the middle and ring nails.
For idea 16, emphasize that the hooked cane is a transparent cutout within an opaque scarlet background—not a white sticker or a solid painted cane.
Bring the numbered reference that matches the shape you want, and decide whether the art should appear on every finger or only on accents. That reduces the chance of getting a completely different candy-cane manicure from the one you saved.
Wear, Upkeep, and Safe Removal
Flat painted stripes are generally less likely to catch on clothing than raised decorations, but small artwork details can still chip or wear. Protect the manicure according to the instructions for the polish or enhancement system you choose, and avoid picking at lifted material.
If your manicure uses gel, remember that removing it is a separate process from applying the decoration. The American Academy of Dermatology recommends avoiding picking or scraping gel polish off the nail and explains protective removal methods in its gel nail polish removal guide.
For a simpler December manicure with less decorative painting, NeoGlow’s simple Christmas nails collection offers easier seasonal alternatives.
Candy Cane Nails: Frequently Asked Questions
Can candy cane nails be pink instead of red?
Yes. Pink and white can create a recognizable candy-inspired pattern, especially when the shades have enough contrast. Idea 13 uses raspberry bands over powder pink, while 14 pairs ivory and deep rose on translucent jelly. Idea 15 takes the motif into brighter fuchsia with a curved corner coil.
For broader pink holiday looks involving bows, chrome, and other motifs, visit NeoGlow’s pink Christmas nails guide.
Which candy cane nails are easiest for beginners?
Idea 2 is one of the least complicated because it uses only a few straight lines on two accent fingers. Idea 4 requires three short strokes along a nail edge. Idea 8 is also manageable if you already feel comfortable painting a shallow French tip.
Perfectly repeated full-nail stripes, chrome French tips, and transparent hook cutouts require more careful construction.
How many nails should have candy-cane stripes?
There is no fixed rule. Ideas 1 and 7 make the pattern the main feature across the manicure. Ideas 3, 5, 14, and 17 restrict the art to selected fingers. Fewer accent nails can make detailed stripes easier to maintain and give the design more breathing room.
Do candy cane nails have to be glossy?
No. Gloss emphasizes the familiar polished-candy appearance, while fine glitter makes the stripes sparkle and matte finishes create a softer surface. Idea 17 uses red glitter stripes; idea 18 contrasts matte merlot with painted white bands and glossy accents. The finish changes the mood without removing the recognizable stripe pattern.
Are candy cane French tips suitable for short nails?
Yes, as long as the stripe count matches the available tip depth. Idea 8 uses two small red marks inside a shallow white French edge. A deeper striped tip such as idea 7 requires more room. Do not force a medium-length French design onto a very short nail by making every stripe so thin that the colors merge.
Save the Candy Cane Design You Can Actually Recreate
For a classic Christmas look, the full peppermint squares in idea 1 or the porcelain French tips in idea 7 are straightforward visual references. For shorter nails, ideas 2 and 8 keep the pattern compact. If you want something less traditional, compare the raspberry-pink stripes in 13 with the deep matte merlot construction in 18.
Save one complete reference, including its shape, base color, stripe direction, and accent placement. The difference between a clean candy-cane manicure and a crowded one usually comes down to those small construction details—not how many holiday decorations you can fit onto the nail.